MMWormhole and WatchKit Beta 2

MMWormhole was released two days ago and the response has been phenomenal. It feels like many iOS developers who jumped into extension development were dealing with this challenge already, and this library seems to solve that problem for everyone. That's really great to see!

The main challenge that MMWormhole could not overcome though was opening the containing app in the background to deliver a message. Many developers requested this feature and to Apple's credit the WatchKit team has been very receptive. Today with the release of WatchKit Beta 2 we got -openParentApplication:reply: that will wake up your containing app in the background to allow it to handle a request. This is exactly what so many developers needed to build more innovative Apple Watch apps, so it's exciting to see Apple taking those requests seriously.

Given the timing of just releasing MMWormhole a few days ago, I was curious whether or not it had jumped the gun. Does this new API in WatchKit obviate the need for MMWormhole? I don't think it does. I think that the two actually work really well together.

One of the areas where we are finding MMWormhole to be so valuable is passing information to the extension that is used to setup the UI on the watch. That includes things like the title or date of a label, or the contents of table cells. If the wormhole represents a set of mailboxes, the messages passed to mailboxes on the extension are a great way to tell the watch app what it's UI state should be whether the watch app is awake or not. It can check the contents of those mailboxes when it wakes up and setup it's UI accordingly. This is a case that can be handled all sorts of ways, including NSUserDefaults or Core Data persistent store sharing, but I think this method of passed JSON or NSCoded messages is a simple and elegant solution.

The other area that MMWormhole tends to make more sense is passing large chunks of data between locations. Because (we assume) the openParentApplication method passes data via XPC, that implies data isn't being written to disk. MMWormhole now supports NSCoding and writes objects straight to disk, and only passes a notification to check the contents of that data to the other side.

Finally, there is the case of informing the extension of change from the containing app. This may be a relatively rare case, but I think it still bears mentioning. One example of this could be a network request on the containing app to download a list of items that need to be populated on the watch in a table view. Rather than frequently check to see if the contents of changed with a timer in the extension, MMWormhole can notify the extension of a change, and the extension can repopulate the table.

The way I plan to use these tools in the apps that I am working on is to use MMWormhole to pass information and updates to and from the extension, and to use openParentApplication to invoke critical commands on the containing app. For example, lets say that the watch app needed to trigger a background save request to update a web service, and that request needed to happen immediately because the user would expect that change to be reflected in real time. Or if having fresh data is essential to the experience on the watch, then waking the app up to provide that may be required. 

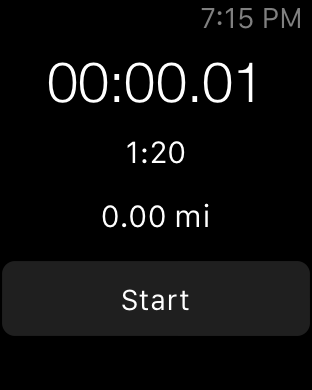
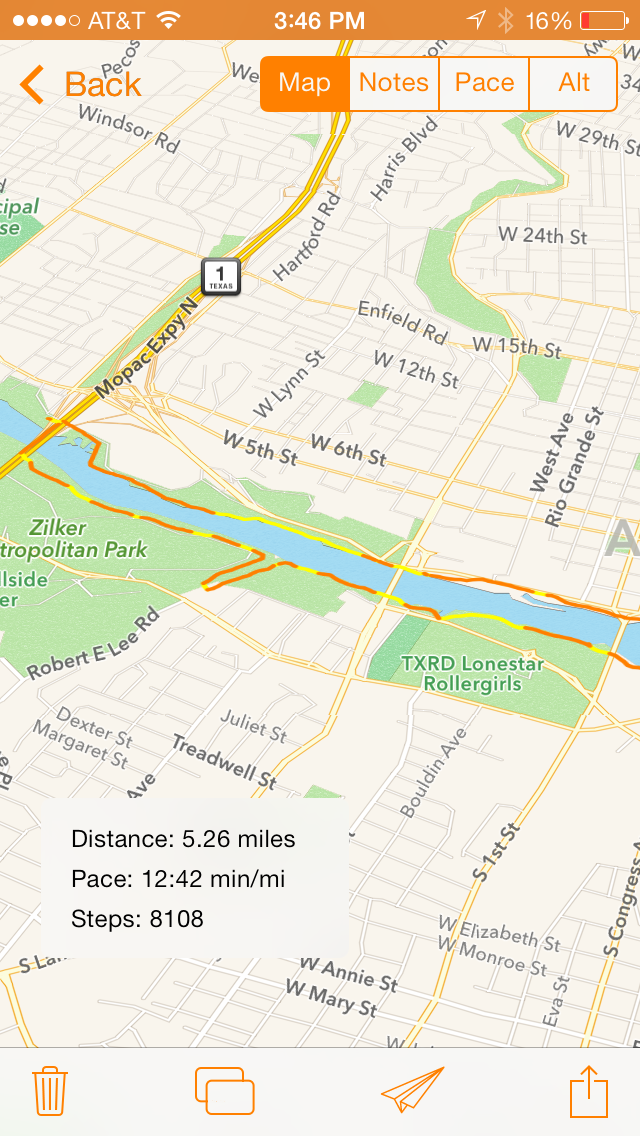
I think it's important that developers consider carefully when to open the parent application and when not to. Opening the parent app every time you want to transfer data is likely not a good use of this method. Using it to invoke critical commands or beginning a user-initiated background task, like location tracking for a navigation or fitness app, seem like great examples. Imagine having a runners stopwatch app that required you to pull out your phone to start the run, rather than just tapping a button on your watch. This API is a perfect way to provide that user experience. But you wouldn't really want to use the reply block to tell the watch how far you've travelled. That's where I think MMWormhole still provides a lot of value.

It's great to see this much progress on WatchKit already. If you haven't already, please file radars on WatchKit and participate on the WatchKit Developer Forums. There is a lot of exciting activity already happening there.


Update: 

This thread on the WatchKit Developer Forums outlines the expected means of communication between the containing app and its extensions. The official response includes using using Darwin notification center to communicate with a running iOS app or a running extension. That makes me feel even better that MMWormhole will continue to be a big help for building extensions, because it directly addresses several communication scenarios for sharing data between an app and its extensions.

Massive External Photo Storage

It's been two years since the last major change to my photo storage setup. The same considerations apply now: cost, performance, and simplicity. Once I decided to move away from an all-encompasing Mac Pro to an iMac, I needed to find a way to bring my photo storage setup along with me.

Honestly, the options for external storage I had this time were very similar to those of two years ago. Drobo's continue to be poor options due to low performance and questionable reliability. Direct attached hardware RAID enclosures are still extremely expensive and probably not worth dealing with for my needs. 

That really just left NAS enclosures versus Thunderbolt enclosures. In terms of price, the two options are virtually the same. Good 4-bay NAS and Thunderbolt enclosures tend to run anywhere from $400 to $700 without drives. Fortunately the hard drive manufacturers seem to have recovered from the typhoons that wrecked havoc on their production pipelines and hard drive prices have come down quite a bit. 4TB drives are well under $200 now, and 6TB drives are in the sub $300 range as well.

I decided to go with a Thunderbolt enclosure purely for performance reasons. Large capacity disk drives in a RAID configuration blow past what iSCSI interfaces can offer pretty quickly. 300MB/s read/write isn't uncommon at all, with RAID 5 enclosures quickly surpassing 500MB/s. That's faster than many entry level SSDs, all with hard disk drives. Another reason was backup. You can easily backup a Thunderbolt enclosure to services like Backblaze, while backing up a NAS to an online backup service is incredibly difficult to do. This way I get to maintain my backup setup with Backblaze, which was a big deal for me.


Hardware

I didn't have to shop long to find a Thunderbolt enclosure that would suit my needs. The OWC Thunderbay 4 is an excellent option with terrific performance and a very reasonable price. The Thunderbay 4 is purely a JBOD enclosure that you can configure any way you want using software RAID. While some forms of proprietary RAID, including the popular SoftRAID 5 are supported, I decided to go with Disk Utility and RAID 1+0 for my setup. I'm sure some people have had great success with SoftRAID, but things like questionable Yosemite support and possible issues around future upgrades were enough to convince me not to try it. I've used Disk Utility RAID for nearly 10 years without issues, so I decided to keep trusting it.

My experience with the Thunderbay 4 so far is mostly positive. The performance on the enclosure with RAID 1+0 is excellent. Here's a screenshot:

The enclosure is mostly quiet while in normal operation. The fan is just barely louder than the 2010 Mac Pro's case fan. It's far quieter though than the iMac's fan on full blast. Anything above 1600 rpm on the iMac's fan will drown it out.

I can, however, hear hard drive noise over the fan from time to time. This tends to be most prevalent when the drives are spinning up or spinning down. I haven't decided what to do about this yet. I'm wondering if placing the enclosure on a rubber mat would insulate some of the noise. I'm also wondering if it's a sign that the hard drives I ordered aren't perfect. It isn't annoying enough for me to abandon the setup or change directions (I've certainly used louder hard drives than these before), but, it's not quite what I was hoping for.

In addition to the Thunderbay 4 I also picked up an OWC Helios 2 PCIe Expansion Chassis to house two PCIe SSDs that I got last year to help extend the life of my 2010 Mac Pro a bit. I already knew this chassis existed when I got the SSDs, so I knew that I could carry them with me if I ended up getting a new computer later.

Fortunately, that has worked out extremely well! The Helios 2 is an incredible product. Transferring the SSDs to the Helios was completely painless. It booted up and recognized the drives immediately, and even preserved their RAID-0 volume configuration. Just awesome.

The performance of the drives via Thunderbolt 2 is also amazing. Here's a screenshot:


System Configuration

Getting all of the necessary hardware is only the first step in the process. How it's all setup to work together is just as important to maximize both performance and usability of the overall system.

I broke everything out into three main volumes:

iMac SSD - The internal SSD on the iMac which is used only for the operating system, applications, and other things like Dropbox and software repositories that can be easily recreated or downloaded from the cloud.

Photo SSD - The striped SSDs in the Helios array combine to create an incredibly fast volume for photo library storage. The only thing on here right now is my Aperture library, which includes metadata, thumbnails, and previews of all the images. Soon this may also include a Photos library or a Lightroom library, but for now it's just Aperture.

Photo RAID - The 4 drives in the Thunderbay enclosure combine to create a 12TB fast and redundant bulk storage volume. This is where the bulk of my data lives, including over 260,000 RAW photos and a few video projects. This drive also contains mirrors of the other two SSDs for backup purposes.

With this system I wanted to maximize performance, redundancy, and portability.

Performance is self explanatory. Redundancy is hugely important to me. Not only do I have a full backup running automatically to Backblaze, and a periodic offsite backup in a secure location, but I want to have as close to full redundancy onsite as I can as well. Part of that strategy is using something like RAID 1+0 to gain 1-2 disk fault tolerance on my primary storage, but it's also got to include backups of my boot volume and photo library. That is achieved by cloning the two SSD volumes back to the bulk storage array.

The third criteria, portability, is an interesting one. What I realized while researching this is that having most of my storage needs met using Thunderbolt that I gain an unprecedented level of portability of my storage system. If I were to decide to use a laptop instead of a desktop, or move to a Mac Pro instead of an iMac in a few years time, all I would have to do is plug in two drives and I'm ready to go. No longer being tethered to internal storage is something of a relief to me now that I think about it this way.


Conclusion

When I wrote about my solution to this two years ago I knew I was essentially choosing the stop gap solution. 

Hopefully this system will buy me another 2-3 years of storage. The bet I am essentially making is that there will be a better solution to this problem in 2-3 years. That will likely be near the end of life for my MacPro, and if Apple is moving away from towers then perhaps Thunderbolt mass storage will be cost effective by that time. Or maybe there will be 8TB HDDs then, and I’ll just upgrade to two of those :)

I had 2TB of photos, and I knew I was adding over 600GB a year, so I hoped that by the time I ran out a better solution would be available. Thankfully, I think it now does, in the form of cost effective Thunderbolt mass storage. 

I actually could have applied the same logic again, and simply swapped out my 4TB drives with 6TB ones and used my Mac Pro as a giant aluminum NAS machine. But in reality, that would have just been prolonging the inevitable. Moving to external storage was necessary and gives me a lot more freedom and flexibility with my data. It also gives me some degree of longevity for this setup. At my current rate of photo taking with a Canon 6D I am adding around 750GB of RAW photos per year. This time around, I'm going to hope that this system buys me another 5-6 years of storage.

I want to also thank macperformanceguide.com again for all of the wonderful work on Mac performance and storage. I found their resources to be incredibly beneficial.

Limitations of Dates and Timers on WatchKit

WatchKit was announced today and I've been taking an early look at it. I've been excited about building a version of Runtime for the Apple Watch even from the time I thought it would be called the iWatch, so seeing what it would be possible to build with the first version of WatchKit has been a lot of fun. While this is clearly only the beginning of what we can do on the watch, if you're familiar with programming for extensions then you have a pretty good idea of what to expect. Thanks to the Today Extension I built in Runtime for iOS 8, I had a working prototype of Runtime for the Apple Watch up and running in under an hour!

Because your iPhone is required to be present for third party apps and GPS connectivity, the core of a running app on the Apple Watch is going to be showing users stats about their run at a glance. It's so amazing and powerful that the watch can display UI simply by the user lifting their wrist. This is perfect for runners because you don't have to futz with using your other hand to tap a button on the watch. Just raise your hand, read your time and pace, and continue on your way. Naturally for my Runtime prototype I decided to tackle this use-case first.

WatchKit includes two rather amazing new controls that previous required all sorts of custom logic and intricate programming to create on iOS: WKInterfaceDate and WKInterfaceTimer. The top label below is a Date, the second label is a timer, and the third is just a normal label.

WKInterfaceDate is a class designed to show a time and date in a label. The time and date automatically update on a per-second basis. The label can be formatted using any custom date format string to show or hide days, minutes, hours, seconds, years, AM/PM, etc. It's visual style can also be customized with different fonts and colors. It's really nice, and completely encapsulates what would previously have required tons of code from developers. I hope it makes its way back to iOS. In an interesting twist, WKInterfaceDate doesn't actually accept a date object as a parameter. Instead, it accepts a calendar and a time zone, showing it's intended to be used to display the current date (or perhaps a future or previous date) to the user.

WKInterfaceTimer is similar, but is designed around a timer instead of a date. It's slightly less customizable than it's sister class, providing only check boxes to choose which calendar components are visible and which are not. It also provides a selection of pre-defined styles to pick between numerical and textual display of time information. It's the difference between "6:42" and "6 hours and 42 minutes".

The real benefit to both of these classes in the context of WatchKit is that their behavior can be pre-defined and updating their contents doesn't require any interaction with the WatchKit extension running on the user's iPhone. Imagine if the only way to display a timer were to fire a refresh timer on the extension and push those updates to a label on the watch? What a terrible experience and drain on power that would be. This is clearly a much better solution.

These classes clearly do what they are designed to do very well, but they do have limitations. I want to document these limitations and propose a few ways that they can be improved. My goal is to help provide feedback to the WatchKit team early in the process. As we saw with Swift, the team addressed a huge amount of feedback and shipped a high quality version of Swift in the 1.0 release. I'm less optimistic that WatchKit will be heavily changed before it's released, but I want to provide feedback as early as possible in the hope of increasing the odds this will happen.

So, here goes. These are some issues I've noticed with WKInterfaceDate and WKInterfaceTimer.


WKInterfaceTimer Does Not Support Counting Up (rdar://19024346)

I believe the WKInterfaceTimer is intended to work both as a countdown and count up timer, but currently the timer only supports counting down. The control description in interface builder actually states "Timer - Displays a string that counts up or down to a specified time." But from the detailed class description online, it is clear that the control is currently implemented as a purely countdown timer.

The issue here is that really the only way to build a count up timer that starts from 00:00.0 and counts up is through this class, so it needs to support this.

The only attribute this class has so far for controlling it's behavior is the date. You can set a date (which the header states will be counted up/down toward). Here's how that actually seems to work now though.

If you specify a date with a positive time interval from the current date, say, 3600 seconds (one hour) from now, the timer will start at 59:59 and counts down like you would expect.

If you specify a date with a negative time interval from the current date, say, -3600 seconds (one hour earlier), the timer will start at 1:00:00 and begin counting up, sort of like you would expect. But this behavior isn't really defined. I haven't actually waited an hour to see if it would stop, but I'm still confused why it would start at 1:00:00 instead of 0:00:00 and count up towards 1:00:00.

Let's say I wanted to implement a count up timer that counted up to a maximum of 12 hours. Given the behavior above, I'd probably expect to input -(3600 * 12) as the time interval offset for the WKInterfaceTimer's date parameter. But that results in a timer starting at 12:00:00 and counting up. :(

The other alternative I could see is specify a date of zero, or possibly -1, as the offset to the date, in the hopes that those would result in a timer that counts up starting from 0:00:00. Unfortunately, neither of those result in the desired behavior either. In both cases the timer simply displays "1" and stays there. The same is true until you specify a negative offset greater than or equal to 60. In other words, the timer really doesn't feel like starting anything below a minute of precision. If you specify -60 as the time interval, you'll get a timer that starts at 1:00 and counts up from one minute.

I'd like to see a cleaner interface to the WKInterfaceTimer class that allows you to specify a boolean for "count up or down", for example. At the very least, I'd like to see a documented and working count up behavior that allows a 0 or -1 time interval that supports a count up timer starting at 0:00 or 0:01.


WKInterfaceTimer's User Interface is Not Sufficiently Customizable (rdar://19024361)

The timer class in WatchKit provides basic support for a few pre-defined date formats, and for which possible calendar components (days, hours, minutes, seconds, etc.) the timer will show. This is actually a pretty nice form of customization, but it's not quite deep enough. Some timers may wish to show hours or minutes even when their contents are zero, or format the text in different ways.

This level of customization is actually available in the WKInterfaceTimer's sister class, WKInterfaceDate, which takes a customizable date format string as a parameter. My proposal is that the WKInterfaceTimer should take an optional date format string as a parameter as well. If a date format string is present, it should use that format for displaying the timer. If the format string isn't present, then use the default customization parameters.


WKInterfaceDate Time Zones Do Not Have Second Level Accuracy (rdar://19024376)

In a last ditch effort to create a properly formatted count up timer on a Watch App, I turned to the WKInterfaceDate control. My goal was to create a WKInterfaceDate control that was configured to show a time in 00:00:00 (hh:mm:ss) format. The control would also be configured with a calendar and time zone to start with a displayed time of 00:00:00 and count up one second at a time from there. I know it's not the intended purpose of this control, but it seems like a reasonable customization to make.

However, the control doesn't seem to respect the seconds component of the time zone. I attempted to create a NSTimeZone where the seconds from GMT are started from zero, and with the current GMT time subtracted away from that. So if the time were 1:07:26 AM, GMT, then the time zone would be created from a GMT offset of 4046 (3600 + 420 + 26).

This actually works beautifully well for the hours and minutes. They will correctly line up at the 00:00 position you would expect them to. But the seconds will not. No matter what you supply as the seconds offset for the time zone, even say -5, the seconds on the WKInterfaceDate always match exactly to the seconds of the system clock. There doesn't seem to be any way to provide a time zone or calendar which changes the seconds of the displayed time/date from that of the system. That means that it's not possible to use this control for displaying a time as an offset from a specific second value. But it would be if the time zone seconds offset were honored.

My proposal here would be to make the time zone's second component honored by the control. If the time zone supports initialization with second level accuracy, and the date control supports presentation at a second level accuracy, then the two settings should work correctly together.


WKInterfaceTimer and WKInterfaceDate Don't Support Milliseconds (rdar://19024387)

The default WLKInterfaceTimer class does not have an option to display milliseconds in the label for the given date as either a count down or count up timer. It also doesn't support a custom date format string, so the option to add this information isn't there.

The WKInterfaceDate actually does support a custom date format string, so supplying a format string that includes milliseconds actually is an option. However, when you supply milliseconds to the format string, the millisecond value is not updated. The WKInterfaceDate control's internal timer seems to be firing once per second, which means it can't update the label's contents on a millisecond basis anyway. 

I'd really like to see millisecond support because it creates a more accurate and better overall experience for runners to gauge their speed and run duration. It's also just a better visual experience to feel like the watch is actually working if the user can see milliseconds counting up. Without that, it feels like the watch is running slow, or that the user is running slow. I do understand the power tradeoffs involved with timers firing at shorter intervals to make this possible, and I know it's not ideal, but some support for it in at least a limited fashion would be nice to have.


I'll be experimenting more with WatchKit over the next few weeks. I fully intend to do my best to ship a compelling Apple Watch app for Runtime when it's released. However, issues like this do show that it's still only the beginning stages of what we can do on the watch. I expect that we'll have more freedom and flexibility over time. My hope is that we'll get just a little bit more of that before the Watch is released, so that we can deliver really compelling experiences to users.


Retina iMac Tests: Xcode

I got my Retina iMac a few days early and I have been spending some time putting it through it's paces. Honestly, I feel like the police are going to show up at any minute and take this thing away...because it feels like it must have been stolen from a secret lab somewhere. It's just delightful to use.

While the primary use case I had in mind when purchasing this was photo editing, I'll probably spend just as much time with Xcode open as I will with Aperture open. Fortunately, testing Xcode performance is pretty easy: hit build, and use a stopwatch.

For my basic test I selected a fairly large project with about 1900 source files and a dozen or so external dependencies linked through CocoaPods. Then I made sure Xcode was finished indexing, cleaned, and built. My goal was to time the build and also monitor whether or not the fans spun up.

I ran the test on a Retina MacBook Pro (2012), a Quad Core Mac Pro (2010), and the new Retina iMac with the Core i7 processor upgrade. Here's the results:

  • Retina MacBook Pro: 1 minute and 3 seconds
  • Mac Pro: 1 minute and 7 seconds
  • Retina iMac: 44 seconds

The iMac is definitely wicked fast. But running a parallelized build process for even that long does have some impact on temperature and therefore fan volume.

On the Retina MacBook Pro the fan did spin up for a second or two towards the end, but as soon as the build finished it spun back down. The Mac Pro never made a peep, of course. The Retina iMac's fans did spin up, and were definitely noticeable to me. Out of the 44 seconds, I would guess that the fan was active for around 10 seconds. As soon as the build finished, it spun back down.

I spent some time watching the fan speed with iStat Menus. The idle RPMs for the fan seem to be around 1200. At 1200 I basically have to put my ear behind the vent to hear anything. So I ran the build a few more times while watching the numbers and listening to what happens.

Around half way through the build the RPM would start to climb slowly. 1250, 1300. What interested me was that by the time it reached 1400 I could definitely hear it over ambient room noise. 1600 was pretty noticeable. Xcode never caused it to climb above that.

I'm definitely not excited about the fan but I'm not hitting the panic button about it just yet either. During normal activity, including incremental (non cleaned) Xcode builds, I haven't noticed any issues at all. 


Buying the Retina iMac, Instead of a Mac Pro

Before the release of the Retina 5k iMac today it had been almost exactly 4 years since I bought a new Mac. But every time I do there is a lot of analysis that goes into it. With the Retina iMac it was no different, but in this case the analysis started quite a while ago. The path to this purchase began over a year ago with the release of the new Mac Pro. But before going into why I bought the Retina iMac, let me explain why I chose not to buy an iMac when making an almost identical decision 4 years ago.

I've always used a Desktop Mac as my personal Machine, and the choice has always been between iMac and the Pro lineup of towers. I switched to towers in 2004 after three different generations of iMacs and and I was very happy with it. The performance was well worth it for the price, with dual G5 processors for $2999. That machine proved to be very capable and served me well throughout my college career.

That lead to 2010 and the release of two amazing new Mac products: The 2010 Mac Pro, which would become the professional Mac user's workhorse for nearly 4 years until the space age Black Cylinder Mac Pro was released last year. And the 2010 iMac, featuring a gorgeous 27" display, Core i7 processor, desktop grade Radeon 5750 graphics, and internal SSD storage. Both machines provided out-of-this-world performance and at very similar price points. Here's a chart that I made 4 years ago for the stats on each machine and the effective price.

2010 iMac vs. Mac Pro

2010 iMac vs. Mac Pro

The Mac Pro turned out to be about $500 more expensive than the iMac, but the iMac had an integrated Cinema Display. The display in the iMac has not always been the best in the world, but with the 27" Cinema Display it was pretty close. This was a significant factor in the iMac's favor. In terms of CPU performance the two were about even, honestly with the iMac beating out the lower tier Mac Pros in every-day tests. The best CPU I could afford at the time was the Xeon 3.2GHz Nehalem, rather than the impressive and consideraly more expensive 6-core Westmere, but the Nehalem proved to be beefy enough. It also turned out that the Radeon 5870 in the Mac Pro did outperform the iMac's internal graphics by a significant margin in most benchmarks, but this alone didn't tip the scales.

Certainly a major factor in anyone's computer purchasing decision is what they intend to use it for. As a professional photographer a critical component for my personal computing needs is fast, reliable, and MASSIVE connected storage. In those days, the options for cost effective reliable external storage were not great. I've written about external storage before, and in general the price increase over internal storage has usually been huge. In 2010, a properly equipped Drobo would have cost north of $1200, and been connected over either Firewire or USB - not nearly fast enough compared to SATA. That and reliability concerns with Drobo and other manufacturers at the time were enough to steer me away from external storage. In effect, I ended up choosing the 2010 Mac Pro almost entirely because of it's internal storage capability and how that effected both storage reliability and performance as well as a significantly lower total system price. That ended up being an extremely wise choice. I now have 4x4TB internal drives in my Mac Pro, for a total of 8TB of redundant RAID Mirrored storage. I currently rely heavily on the Mac Pro's internal storage.

If all of the above considerations were still true today I probably would not have bought a new iMac today. But two things have changed dramatically in the last year that really tip the balance for me, and I think for many other professional and pro-sumer desktop Mac users.

Expandability

The first is the way in which expandability works on high end desktop Macs. In previous models  the most important form of expandability was internal. Certainly there are cosmetic benefits to internal expandability in the form of simplicity and having a clean desktop working environment. But the biggest benefit was performance. Having access to an internal SATA bus for storage was critical. Having access to PCI slots to install additional cards was a key requirement for many users. Even having access to RAM slots or the GPU was important to many people. You could even upgrade the CPU on the Mac Pro if you really wanted to.

But all of that has changed over the years. Apple has begun bundling more and more components permanently into products. First was the CPU and graphics in the iMac and Laptop lines, then came RAM and storage being soldered onto the motherboard. The iMac and Laptops were never easily expanded but pro users always had the option of purchasing an expandable Mac tower if they needed that feature, until the new Mac Pro debuted last year. The new Mac Pro leveled the playing field for expandability. Now all of Apple's products had the exact same expandability option: Thunderbolt.

My friend Thomas Duesing really nailed this 4 years ago. In discussing whether or not the iMac or the Mac Pro were the right call back then, he pointed out that all of this logic would change if Lightpeak (now Thunderbolt) were available. Well here we are in 2014, and Thunderbolt 2 is the missing link in expandability across the Mac lineup, not just for storage but for other accessories as well. Thunderbolt allows you to add super fast SSD storage, bulk HDD storage with better than SATA performance that is no longer limited by USB or Firewire, and best of all: PCI slots. With accessories available from OWC, you can add PCI slots to an iMac for the first time in that product's history. The expandability fight between the iMac and the Pro desktop is now dead even, and all it took was the Mac Pro dropping internal expansion from it's lineup. Accessory makers took notice of that and created a whole new lineup of products to fill that market. The results of that are huge for the professional market, and are now making it possible for someone with professional storage needs to consider any of Apple's Mac products as a viable option.

Display

The second and most obvious change in the calculus between the Mac Pro and the iMac is, of course, the display. In 2010, the bundling of a 27" Cinema Display was essentially a nice to have. Afterall, an equivalent monitor was an expensive but available $999 accessory to any other Mac computer. Now, though, the iMac has a tremendous advantage. I haven't seen the new 5k Retina Display in person yet, but I have no doubt it will be absolutely stunning. When I was at CES this year I went around to every display manufacturer to see their 4k computer monitors, and all of them were simply gorgeous. I would have used any of them as a desktop monitor, and for most of December/January I desperately wanted to. That was when my purchasing decision began: should I continue using my 2010 Mac Pro, or go all in on the new Mac Pro with an external 4k monitor?

But by early 2014 it was clear that there were actually a lot of problems with 4k monitors on the Mac. For starters, most Macs weren't capable of powering them - only the new Mac Pro and the latest retina MacBook Pro were capable of running them above 30hz, and even then only with the right model displays. The 4k monitor sold in the Apple Store by Sharp was capable, but this monitor sells for $3595, over $1000 more than the basline retina iMac does. Moreover, driver support for these monitors in OS X was poor. OS X Mavericks didn't include support for scaling the resolution of these screens the same way that it did for the Retina Display in the MacBook Pro. As a result, icons and text were rendered unusably small for everyday use, even if photos and video were beautifully sharp. At best, these monitors were only useful as extra monitors for detail-checking photos and 4k video - not as monitors for normal every-day productivity.

All of that has dramatically changed with the 5k Retina Display on the iMac. We got our first hint that this display would hit the market about a month ago which is when rumors started running rampant about the retina iMac. This display would literally pixel double the existing display in the Apple Cinema Display and 27" iMac, making it the perfect solution for a retina Mac desktop monitor.

For the photographic professional and anyone interested in fine pixel level detail this display is the best there is. To me, it's an absolutely must have. Now that expandability has been equalized, the existence of this monitor tips the balance enormously in favor of the iMac. Honestly, without the existence of an economically priced external monitor of the same quality, it's hard to justify the purchase of a Mac Pro at all, except for extreme cases where raw workstation grahpics and multicore CPU performance are required.

When I re-recreate my 2010 chart for the new Retina iMac and latest Mac Pro, and also factor in the purchase of an external display, the results are stunning and obvious. 

2014 iMac vs. Mac Pro

2014 iMac vs. Mac Pro

When you include the purchase of a new monitor the Mac Pro costs more than double what a retina iMac costs with similar specs and likely similar performance in real-world tasks. In the chart I chose to max out the graphics processors on both models, since the graphics on both are not upgradeable, and having the best graphics possible makes the most sense from a product longevity standpoint. Of course, and equivalent display to the 5k Retina Display on the new iMac does not exist, but I went with $2499 as the estimated price, because of the article by Anandtech claiming that as the eventual price point

Of course, this comparison is further complicated by the fact that the current Mac Pro (and all current Apple computers) are incapable of powering that Dell 5k monitor at all, let alone over a single Thunderbolt port. This is also why the retina iMac does not appear to work at full resolution in Target Display Mode - because no Mac can actually run it as an external monitor. This consideration makes the Retina iMac the only choice for a desktop Mac with best-in-class display performance.

So those are all of my reasons for going with the Retina iMac now. But there are still some possible concerns that I have about the machine.

Concerns

The biggest one has got to be graphics. Driving that many pixels is going to be taxing for any GPU hardware, and will likely be quite a task for the AMD mobile GPUs included with the new iMac. I know from experience that this can be the case, because of what happened to mine and several other 1st generation Retina MacBook Pros. About 6 months ago, the GPU on my 1st generation Retina MacBook Pro died suddenly. It was replaced under Apple Care, but I expect that it just burned itself out working so hard to power that display. It's possible that the same thing could happen on the Retina iMac. Because of this, I would recommend to anyone considering the purchase of one that they upgrade the GPU to the 295X, just to be safe, and that they also purchase Apple Care (as I did) to offset the financial risk if an issue does arise.

Of course, there is also the possibility that the machine will simply be underpowered, certainly compared to next year's model or even to an eventual second generation Black Cylinder Mac Pro with the hopefully inevitable external version of the 5k display. So why not wait until next year and see how the rest of the desktop landscape shakes out?

For starters, I think I have waited long enough for this level of quality machine. While my Mac Pro may only be 4 years old, the three displays connected to it are each nearly 10 years old. I've still got the original 20" Aluminum Cinema Display that I purchased in 2005, and two additional ones of the same model that I purchased used more recently to pair up three of the same monitor on my Mac Pro. I love the three monitor setup, but the quality of these displays is clearly lacking compared to even the normal Apple Cinema Display. I held off purchasing one of those in order to wait for something like this, and I want to take advantage of it immediately. I don't want to wait to get 5k Retina.

But personal feelings aside, I've learned that when Apple releases an obviously breakthrough product like this that the time to jump onboard with it is immediately. There's no way to tell when an external version of this display will be available. Given the support in the rest of Apple's hardware landscape, I don't think I'd expect it to happen next year. We were hoping for a retina iMac last year, and it took an additional year from those rumors. From the early reports I am reading, Apple is having to bend standard specifications like Displayport just to get the iMac to work at all. I don't think they are ready to standardize this into a standalone product just yet, or I think they would have already done so with this one. And even when the external version does come out, it will still likely be priced higher than $999 initially, and will still require the purchase of a separate and very expensive Mac Pro. 

The place where I would still feel conflicted is for users who require their personal machine to be a laptop. Some people prefer to use the same machine at work and at home, which I can understand. But I don't have any issues swapping between a laptop at work and a desktop at home, as I have done for many years. Some people work for themselves and can't afford to purchase two machines, which also makes complete sense. In that scenario, having a laptop is usually of utmost importance for portability reasons. In that scenario I think the price of the iMac at least makes this conversation a much easier one. $2499 for even a baseline Retina iMac may still leave a bit left over for at least the purchase of a baseline MacBook Air, which may satisfy the portability needs of some users considering a pro level Mac desktop. For some users, an iPad may also be a suitable portable computer.

Accessories

But even disgarding the display as a key advantage for the iMac, the level expandability playing field would still favor the iMac because the only real advantage of the Mac Pro would be extreme multi-core CPU and GPU processing performance. For the photographer, and likely for many professional and pro-sumer Mac users, that advantage isn't enough to tip the balance.

Regarding expandability, I want to share two more key details about how I plan to actually use my Retina iMac. There are two products from OWC that made all the difference to me in considering the purchase of the new Retina iMac.

The first one is the OWC Mercury Helios 2 PCIe Thunderbolt Expansion Chassis that supports Thunderbolt 2 and allows the addition of two PCIe card slots to any Thunderbolt Mac for a somewhat expensive but still worth it price of $498. Some users may require this product for adding eSATA slots or something else, but I personally plan to use it with my two OWC Mercury Accelsior PCIe SSD drives that I bought for my existing Mac Pro last year. In a stripe configuration, these drives deliver over 1000MB/s read and write performance, which outperforms a standard SSD by a considerable amount, and should even be faster than the built in PCIe storage in the Mac Pro and Retina iMac.

The second one is the OWC ThunderBay 4, a Thunderbolt 2 capable RAID-ready 4 drive bay for fast and reliable external storage. Basically, this $459 device lets me swap my four 4TB drives straight into this enclosure from my Mac Pro and continue using them without any performance hit that would typically be associated with USB, Firewire, or iSCSI. 

Conclusion

The time feels right to move back to the iMac. 10 years ago the performance gap between an iMac and the PowerMac G5 was absolutely massive. But by 4 years ago the gap was much smaller, and as of last year the situation had actually reversed itself. When the new Mac Pro was released and benchmarks started to appear I was shocked to find that the iMac actually beat the Mac Pro on many benchmarks, including most gaming tests and several real world app tests. Clearly now that the differences of expandability are moot the iMac has asserted itself as a viable computer for professional Mac users.

One of the things I wrote about my purchasing decision to some of my friends 4 years ago was the topic of longevity. Spending over $3000 for a computer is a big deal these days, and you want that purchase to last you a long time. I got over 4 years of life from each of my Mac towers. I believe that I can get 4 years of life out of this iMac too. One reason for that is expandability through Thunderbolt. I know now that I can add as much storage as I would ever need through that, and the inclusion of Thunderbolt 2 means there should be plenty of available throughput to expand into over the years. I expect the availability of great Thunderbolt accessories to grow dramatically as well, even more than has happened over just the last year. But I also know that I tended not to leverage my Mac tower's expandability to it's fullest. I never upgraded my GPUs, CPUs, or other components beyond RAM and storage. I'll max out the iMac's RAM through OWC, and add Thunderbolt external storage, and I fully expect that to last me for years to come.

But the real deal is the 5k Retina Display. What I told my friends at work today is that I could easily see myself spending weeks just looking through old photos in my library on the new display, just because of how different they're going to look now on a better monitor. That's when I started to consider just how silly it was to have a $1999 Canon 6D that shoots super detailed 5472x3648 images but with no good way to enjoy them on a 1680x1050 10 year old monitor. The new 5k display is the sort of monitor that would make switching from Aperture to Lightroom fun, because of how great it's going to be looking through all of my old high resolution photos and seeing them in a new way. And of course, re-playing a few great games and writing a few new iOS apps should be fun too.

All in all, I see the Retina iMac as being the computer that I want to use for the next 4+ years. That's what made it an obvious buying decision for me, even on day one, and even though it means leaving the Mac tower after 10 years and switching back to the iMac lineup. Now just feels like the right time to do it.


Getting Things Done on the "TiBook" G4

The recent articles by Andrew Cunningham at Ars Technica and later by Riccardo Mori were very interesting to me. They include two sides to a discussion on whether or not old Macs remain useful for work. As a life-long Mac user growing up in the 90's Mac OS 8, and 9 were my bread and butter. In 2001 when the Titanium PowerBook G4 was announced, I remember wanting a poster of it for my wall. I certainly never felt like any of these technologies were mediocre or average. They were exactly what I wanted to use for all of my work.

The laptop I took to College was a PowerBook G4 "TiBook" 667 MHz model with 768MB of RAM. My freshman year I treated myself to a brand new 7200 RPM Hard Drive (I think it shipped with 4200). That same year, in 2005, I installed Mac OS X 10.4 "Tiger". This was my primary laptop until 2011 and the same machine with the same hard drive and the same installation of OS X Tiger is still working to this day.

The remarkable thing to me about this machine is that it continues to remain fully capable to this day of performing one of the required capabilities for my job as a freelance photographer: selecting and editing photos at an event to publish to a website. To this day I could pack up this laptop, take it to an event, and select a dozen images from my Canon DSLR to edit, caption, export, and submit to a client. And I could still do it all in under 15-20 minutes without issue.

There are a few key characteristics about this machine that enable this. One of them is Firewire. Having a Firewire card reader gives you great performance reading straight from a  CompactFlash card. The other is software. Two amazing apps continue to run very well on OS X Tiger and were the key components to my photography workflow:

Even today in the field on my iPad, or on my Mac Pro at home, I replicate that workflow on Photo Mechanic in other apps. The basic premise is simple:

  1. Browse through a memory card's image folder and tag 10-20 interesting images
  2. Evaluate the 10-20 to make sure they are sharp
  3. Apply slight color correction/crop if necessary
  4. Name each image in a descriptive way, usually with the subject's name
  5. Export each selected image at a specified size, compression, and color setting

Photo Mechanic made those first few steps extremely easy, and integration with Photoshop CS4 and Droplets completed the process. Narrowing down to those images and emailing them out was a piece of cake.

I think the last event I shot with my "TiBook" G4 was a Texas Basketball game in 2012. The folder of those named and exported images is still on the Desktop when I boot it up.

There are many other memories I have of work I did on that laptop. Countless hours in the CS labs at UT. Organizing photos during summers at Philmont. Even recording and mastering an album for some aspiring musician friends. And much of that more than 7 years after the machine was built.

I really loved using that Titanium PowerBook. That it has continued to work so well for so long speaks volumes about the quality of it's engineering and the quality of Mac OS X 10.4. When I first saw the Ars Technica article I saw the link to a tool called Leopard Assist that lets you upgrade older machines to 10.5. I thought to myself, "man, I could have been using Leopard all of those years?" But upon reflection, I'm glad I didn't try that. I'm glad that I left that machine exactly the way it is. For the work I was doing then, and for the work the machine is still capable of doing now, it was perfect the way it is.

Thoughts on the iPhone 6 Plus

I decided to get the iPhone 6 Plus because of how it seems to be a new class of device, between the iPhone and the iPad. I've noticed recently that I use my iPhone more and more, far more than I use my iPad. Some people decided to get an iPad so that they wouldn't have to carry a MacBook around. But for me, I decided to get an iPhone 6 Plus so that I wouldn't have to carry an iPad around.

I think the key difference between the smaller sized iPhones and the iPhone 6 Plus is that the Plus is better suited for sitting down in a chair or on the couch, and the other phones are easier to use while moving around. Thats the key area where one-handed use really matters. As a 6'5" person I can still use the 6 Plus one handed, but it's a bit of a stretch. It's certainly more comfortable to use while sitting down. And that to me is where the 6 Plus really shines. Text is a joy to read. There's plenty of room for content. The iPhone 6 Plus is by far the best email device I've used. It's quite nice for Twitter as well.

So far it doesn't seem that the larger device is any more difficult to run with. I have slightly changed my running habits though, choosing to carry my phone in a waistband rather than an armband. The iPhone 6 and iOS 8 update to Runtime was released yesterday, and I plan to use it for a few weeks while trying out different waistbands and write up some thoughts on that later. I can already tell that the longer battery life will be useful for hikers and trail runners though.


Apps

The iPhone 6 Plus really demands apps that have been updated for the larger screen. Its just such a better experience when apps are rendered natively to support it. I've already switched from Tweetbot to Twitterific because the Twitterific support for the screen is that much better. I haven't seen any RSS clients that have been updated yet, but that will instantly make the phone more usable for me when one is. We've been in the process of updating two apps that I use on a daily basis at Mutual Mobile, and I already can't imagine going back to the non iPhone 6 Plus versions of those. 


Keyboard

I instantly fell in love with the larger portrait orientation keyboard on the iPhone 6 Plus. The larger space for each key makes typing on it much faster and less prone to error than before. I have pretty big fingers, so the larger tap targets are definitely nice to have.

I can tell a difference between the "scaled up" keyboard in legacy apps, and the natively rendered keyboard. The older one's key positions are just slightly off, which leads to a few more errors. I wouldn't say its a major source of frustration, and in any case, shouldn't be something we have to deal with for too long. I expect most apps to be updated fairly quickly.

When I first saw the new landscape keyboard with a bevy of special keys I thought it sounded like a great idea. But after using it, I have two problems with it. First is that all the letter keys are in the center, which is too much of a stretch to comfortably type on...even for me, a guy with pretty large hands. Also, because there is now so much stuffed into that keyboard, the keys themselves are slightly too small of tap targets for me to comfortably type on. I was wondering if this keyboard would win me over to start using my phone in landscape orientation more, but the answer so far is no.


Camera

As a freelance photographer I am more or less obsessed with cameras, and even though I usually carry a DSLR most places that I go, I still care deeply about the quality of camera on my iPhone. With every iPhone model I've had, the number of pictures I've taken with it has doubled, from about 600 pictures over a year with the iPhone 3GS, to over 6000 last year with the iPhone 5s. The better the camera is on my phone, the more I tend to use it.

The first few test frames I captured with the iPhone 6 Plus were very impressive. Color was incredibly accurate, focus was good (and fast, and automatic). Sharpness was also good. To be honest though, it's easy to make photos look good on the iPhone 6 Plus's incredible display. Yes the camera is good, but its the display that makes the photos look incredible.

Coffee, and Cacti

Coffee, and Cacti

There are two reasons I continue to use a DSLR. The first is the lenses. There's just simply no way for an iPhone to replace a Canon 300 f/2.8 for shooting sports or wildlife. The second is detail and sharpness, which is difficult to notice when judging an image zoomed out on a smartphone display. Here the iPhone continues to get better and better, and especially when viewing that scene on your phone, or even on a laptop, the level of detail is good enough that the image continues to look exceptional.

But when you zoom in on an iPhone image, even one from an iPhone 6 Plus, you start to notice the issues in JPEG compression and the results of having a sensor half the size of a dime versus one larger than a quarter. Below are two screenshots from the Loupe tool in Aperture taken from images of an apartment building in downtown Austin. The one on the left was shot with a Canon 20D and a Canon 17-40 f/4L lens. The one on the right is of an image shot with the iPhone 6 Plus.

Canon 20D vs iPhone 6 Plus

Canon 20D vs iPhone 6 Plus

Notice the difference in clarity in the fine details. When you zoom in on the Canon image, the detail remains. The Canon 20D image is still sharp, all the way down to the balconies and door frames. The iPhone 6 Plus is muddied and has a pastel feel to it. While you would never notice this viewing the image zoomed out on a phone or computer, if you tried to print the image out at 300 DPI you would definitely notice.

This is more than a fair test too. The Canon 20D is 10 years old, produces the same size images as those on the iPhone 6 Plus, and still takes the iPhone to task in fine details and sharpness. The difference between the iPhone 6 Plus and the newer Canon 5DMIII or 6D would be even more striking. 

The iPhone 6 Plus is still an amazing camera. In areas that arguably matters the most, color and focus accuracy, it gets full marks. But if I was hiking the John Muir Trail again today I would still have a Canon 6D in my backpack, without a doubt.


Phone

As a phone, I really enjoy the larger size of the iPhone 6 Plus. It puts the microphone closer to my mouth, which results in better audio quality for the receiver. I really don't have any issues talking on the phone like this, but then again, I don't talk on the phone very much.

I do feel like the phone speaker on the iPhone 6 Plus has taken a step backward. Its a very quiet speaker, and its also very one-directional. If the speaker isn't centered perfectly on my ear, I can barely hear it. I don't remember having that problem with previous iPhones.

My least favorite part of the iPhone 6 Plus is the vibrate motor. The sound it makes flat out sucks. It sounds a more like a buzz than a vibrate. It's also incredibly loud. I wish there were a way to improve this via software, because I'm not looking forward to spending a year being notified by this sound.


Final Thoughts

I enjoy using the iPhone 6 Plus, but I still view this coming year as an experiment. Will I enjoy using the iPhone 6 Plus enough to continue using it's 's' version next year, and completely eschew using an iPad as well. I think that I really will need a year to answer that question. I've already started to become more comfortable carrying the iPhone 6 Plus around every day. It feels comfortable in my pocket, and I'm more comfortable pulling it out and using it on the go. I'm also still learning which ways I enjoy using it most. It still is a bit heavier than I would like, making it easier to hold by cradling it in your hand or resting it somewhere, rather than trying to hold it up in your fingers, which can be tiring. 

But no matter where the iPhone 6 Plus fits in my digital lifestyle, it is still a great phone. And I still haven't bent it yet, which is a plus. 

Introducing Runtime for iOS 8 with Stopwatch Widget, HealthKit, iPhone 6 and 6 Plus Support

Runtime was introduced last year as a simple run tracking app designed to provide a best in class experience for tracking your routes wherever you run, bike, hike, or go to explore the outdoors. The app places your content first and provides an intuitive interface around tracking where and when you exercise. The new version of Runtime for iOS 8 builds from Runtime’s original design for iOS 7, and seeks to become an even closer companion to runners on the iOS platform. The update ships Wednesday alongside iOS 8.

It’s interesting to think about the role apps play in our every day lives. Fitness, of course, is an important part of all of our lives, and so in many ways the fitness apps we choose to use have a major impact on our overall health and fitness levels. Apple recognizes this too, making Fitness a central design pillar of the Apple Watch experience, and a cornerstone of the iPhone line with the M7, M8, and HealthKit.

Late last year I made fitness my primary goal for 2014. I’ve always been very active, but recently my fitness slid more than I was comfortable with. I wanted to pick up the pace in 2014 and get back in shape. I completely changed my diet and ramped up my exercise routine. I enjoy running and I use Runtime to track all of my runs. At my peak in May I was running 3-5 miles every day. I’ve run over 500 miles this year, and lost 65lbs. I’m now in the best shape I’ve ever been in. Some of that is thanks to Runtime, and in that sense, it is the most important app on my phone.

Tracking your fitness goals with Runtime

Tracking your fitness goals with Runtime

Because I use Runtime so much I am always looking for ways to improve it and make it more useful to runners. iOS 8 was a major opportunity to do just that. With iOS 8, Apple focused on providing new ways to enable developers. The goal with Runtime for iOS 8 was to leverage some of these new technologies while also providing new features that runners had been asking for. Here’s whats new.


Stopwatch

Its important for runners to have a way to easily start and stop their workout while also having information about their activity at a glance. The new Today Extensions on iOS 8 are a perfect way to do that. 

Before iOS 8 if you wanted to start or stop a run, or see your current time and distance, you would need to unlock your phone and open Runtime. Now with the Stopwatch Widget all you have to do is swipe down to open Notification Center.

The New Stopwatch Widget

The New Stopwatch Widget

The Runtime Stopwatch Widget lets you start a run conveniently from Notification Center, and have full control while running without opening the app. The widget also shows you your time and distance with just a swipe so that you can stay informed about your progress while working out. When you aren’t running, the widget shows you your current daily step total, to help you get a better picture of your daily activity.

The widget really changes the way that I use Runtime. I listen to podcasts while I run, so Runtime isn’t always my foreground application while working out. I also like to run for time, so having precise control over starting and stopping my run is important to me. The widget gives me that, and its been a joy to use.

But the widget isn’t the only improvement to Runtime’s stopwatch. The in-app stopwatch screen has been redesigned to show an interactive and live updating map of your route. This map is a very important usability feature to many runners, especially trail runners. I decided that this feature had to be added during one of my trail runs, a 15 mile run on Austin’s Barton Creek Greenbelt trail. I ended up getting lost about half way in, and needed to find my way back to the main trail. A live map with my route was exactly what I needed to do that. I think this will be a huge help to a lot of trail runners out there.

The New Runtime Stopwatch

The New Runtime Stopwatch

HealthKit

I’m excited about the potential that HealthKit offers users to gain a better picture of their overall health and fitness. To help further this, Runtime will store your running distance information in HealthKit. This fits with Runtime’s principle of giving users as much control over their content as possible. People using Runtime will have that important piece of their fitness picture available in the Health app for iOS 8.


Stats

Providing more statistics has been the most requested feature from the first version of Runtime. Many runners are very goal oriented and tend to sweat the details. How is my pace, is my time improving, have I been pushing hard enough? The first version of Runtime included a very important feature for giving people a clear picture of their workouts: highlighting time spent running versus walking on a route. Runtime now also includes quick access to 10 important stats and interactive charts to explore each run’s pace and altitude, as well as all of the runs at a given place to spot trends over time.

Getting a better picture of your workout stats

Getting a better picture of your workout stats

The 10 available stats are computed for each place that you run. You can use the places feature to organize runs into groups, either for different specific locations that you run, or for different training periods while you’re building up to something bigger.

The stats themselves are grouped into three different types. Cumulative stats, like the total distance you’ve run. Weekly average stats, to give you an idea of how your performance varies week to week while training. And timeline stats, that chart all of your data over time to give you a fine grained look at individual workouts.

From the stats screen you can select any stat, which will be shown in the header for that place. You can also tap the information icon to view an interactive chart for that stat. The first version of Runtime also featured stats for pace and elevation for a given route, and those are still there, but they now feature an interactive chart as well.

I’d also like to give a shout out to Boris and BEMSimpleLineGraph for powering the interactive charts in Runtime. If you’re a developer looking for a great library for drawing graphs, look no further. 


iPhone 6

2014 was a big year for the iPhone. It has been clear for a while that Apple would introduce larger screens for the iPhone 6, and I started thinking about what that could mean for Runtime. I’m pleased to announce that Runtime will feature native support for the iPhones 6 when they launch.

Runtime places a high emphasis on maps, which make up the majority of the app’s 4 main screens. With a larger screen, Runtime can show you more of the map to give you an even richer picture of where you ran. On the places and routes screens, this means bigger map thumbnails so that you have more information at a glance.

Full support for iPhone 6 and 6 Plus

Full support for iPhone 6 and 6 Plus

The best example though is the new Stopwatch screen. On the iPhone 5s the interactive map is relatively thin. Its still big enough to see your route, but isn’t as glance able as a larger map. You wouldn’t want to make it bigger though, because the start/stop controls and the stopwatch time itself are still the most important objects on the screen. But with the iPhone 6 Plus there is enough vertical space to fit the controls and time, and a rich map that shows plenty of information at a glance. This is a perfect example of designing to take full advantage of the new largest iPhone.


Free

The biggest feature of Runtime for iOS 8 is that the app is now free. The Stopwatch Widget, HealthKit support, and iPhone 6 support are all included for free. This really makes Runtime the best in class app for tracking where you run, for everyone.

Runtime also seeks to be a powerful app for the avid runner. The new version includes an In-App Purchase to upgrade Runtime with many advanced features for the avid user. These include the new powerful stats feature, a customizable interval timer, the engaging flyover mode that shows you a 3D overview of your route, and the ability to track multiple places within the app. All of these features are available at the one-time upgrade price of $4.99.

Upgrade to Runtime’s Advanced Features

Upgrade to Runtime’s Advanced Features

Of course, Runtime already has a large user base, which I am very thankful for. I’m very pleased to be able to provide all of these advanced features, including the new stats feature, to everyone who purchased the first version of Runtime. Users who purchased the app before will all have these advanced features available to them automatically, as well as the new iOS 8 features. Thank you to everyone who supported the first version of Runtime!


Wrap Up

I’m very excited about the new version of Runtime for iOS 8 and I can’t wait for you to try it out. I continue to use the app every day, and its had a major impact on my personal health and fitness. There’s even more included in this release, including bug fixes, stability and performance updates, and some UI improvements. Its a big update for Runtime and I hope you enjoy it. Thanks!


WWDC 2014 and Apple's Trust in Developers

A few weeks into building my first small iOS app in 2010 I decided to watch some WWDC videos covering the various frameworks I was planning on using.

Every single video was something new and exciting that I didn’t know about, and every single one gave me a new idea or feature I wanted to add to my small (but quickly growing) app. It was electrifying and incredibly addicting. But more than anything, it was inspiring. 

Thats the way I felt all week at WWDC 2014. I haven’t felt this inspired by the platform since I started working on it 4 years ago. From all the Kits to Swift. We even got extensions, something I’ve been wishing for since 2012. The amount of new tools and improvements released this year is simply staggering.

When I think back to last week, and also on the last 20 years of being a user of Apple products, I can tell that the state of Apple’s software platform has never been stronger.  

Apple has always been great at building excellent platforms that provide great experiences for their users. And their platforms have also been great for developers. Apple has an incredibly loyal developer following, which has grown exponentially in recent years.

But developers and their creations have not always taken center stage on Apple’s platforms. In many cases both on iOS and on the Mac they have played second fiddle to Apple services and to Apple-provided apps.

There have been different reasons for this at different times. While the Mac was still growing in the early 2000’s, Apple was investing heavily in building the best apps possible on the Mac to attract users to the platform. This was an obvious thing to do. For years, Apple set the bar for quality on the Mac with their own software. This was when we saw the introduction of many landmark apps on the Mac, like iMovie and iPhoto. They blew everything else away, not only on the Mac, but on any other platform. They were huge selling points for attracting new users to the platform. But they were built by Apple, not by 3rd party developers.

On iOS there have been different reasons for Apple’s dominance. There was a time when certain categories of apps weren’t even allowed, or APIs weren’t available to developers even though they were used privately by Apple. But also, while more recent iOS updates have been extremely powerful and friendly towards developers, Apple would usually reserve its own content for center stage. PassBook, the new iWork, Notification Center, and of course the new Maps. All of these were highly emphasized and touted by Apple as key user-facing features of their respective iOS updates, dwarfing improvements made by developers in their own apps on the platform.

But this year we are seeing a big shift. Apple has opened up so many new capabilities to developers. They’ve provided the tools for entire new categories of apps to be built. But most importantly, they are including developers in the story of how these new releases will be perceived by end users.

When a developer installs the beta of iOS 8 they’ll notice how similar it feels to iOS 7. In many ways, the initial beta is the same experience as iOS 7, with very few obvious new user facing features. But there’s a very good reason for that, which Apple highlights clearly on its iOS 8 home page. The best features of iOS 8 are being built RIGHT NOW by Developers!

With iOS 8 and Yosemite, Apple has given Developers the ultimate vote of confidence. Apple is trusting us to make iOS 8 the best release of iOS ever. And they gave us the tools to do it, with the most amazing developer release we've yet seen on the platform. They’ve given us the ability to build entire categories of apps that didn’t exist before, and extend the system in ways never before possible save for system apps and sanctioned services. Its such an exciting time for the platform right now, and thats without even mentioning all of the improvements and the exciting future in store for Xcode, Swift, and the Cocoa development environment.

We’ll remember this year for a long time. Apple just gave us the keys to the family car. And I am super excited about it!

Conrad's Guide to Adaptable and Stress Free Travel

Traveling has become something I enjoy a great deal over the course of the last few years. I've had a chance to visit some amazing cities and places, try lots of new things and meet lots of new people. I've also learned quite a bit about how to travel, which includes what I take with me, my daily routine, and various other tips that I believe lead to a fun and exciting adventure. Presently I am starting my last week of a two week trip to Germany. I've wanted to visit Germany for as long as I can remember, and so far the trip has been one of the most rewarding travel experiences I've had. Here's a few tips that I think have made the biggest difference.


Travel Light

I really can't emphasize this enough, but for most trips its best to pack as little as possible. For a business or leisure trip, carrying only a single bag is essential. Packing light is what makes a stress free and adaptable travel experience possible. Its what allows you to go where your heart tells you rather than where your wheeled luggage will take you.

Packing light doesn't have to be difficult, or involve many sacrifices. It does require some extra planning, and the acceptance that what you don't have with you can always be bought later.

The main area I focus on while packing is clothes. The core kit I bring almost anywhere includes 4 shirts, 4 pairs of socks, 3 pairs of underwear, and the pants/shoes I am wearing. Added to that, depending on the circumstances, can be workout shorts, a jacket, rain jacket, and a new item I recently acquired: travel pants. Normally I only bring and wear a pair of nice jeans that can double as casual or semi-formal dress. For this trip to Germany, I also packed a very light weight pair of Patagonia hiking/travel pants that dry super fast, feel great, but also look nice enough for walking around town. The key to travel clothes and packing light is making sure everything can serve a dual purpose. A t-shirt as a workout shirt or undershirt, for example. A jacket and a rain jacket as layers for wet and extra cold weather. Carrying items that service multiple purposes saves space and weight so that you can pack less and move quicker.

Doing laundry on the road helps you get away with packing less. Many hotels have washing machines, but I also carry some Tide travel packets just to be safe.

Besides clothes, I carry a Camera, Laptop, iPad, a very limited set of toiletries, and a small electronics kit including some display adapters and chargers, head phones, and a very handy rechargeable battery for my iPhone.

My backpack is the Goruck GR1, which I've written about before. For the last 2 years its served me very well through multiple cities, mountain tops, and across 3 continents. I can't recommend it enough.


Walk Around

Walking around as much as possible rather than taking a cab or subway can teach you a lot about a city or town. In Munich for instance, I walked about 6 miles the first day I was there, from the train station to a bar and to my hotel. Taking the subway would have been quicker, but in the two hours it took to walk I got to fully understand the lay of the land and spot several landmarks that I'd wanted to visit anyways. It was a super valuable way to observe the city and get to fully experience it. Of course, I took the subway some of the time, but I made sure to walk at least half the time as well so that I could see more of the place instead of just specific sites.

Not every city, including many in the US, are as walkable as Munich. However, I still think this can be applied to most places you are likely to visit.

Following the mantra above and packing light is what enables you to be more mobile and enjoy walking around. Having encumbering luggage limits your free will and options while traveling. Packing light gives you new-found flexibility to go visit a park on the way to your hotel rather than taking a cab there.


Don't Plan Ahead

This may sound counter-intuitive, but I'm completely serious. Don't plan ahead. Read the guide book and talk to some friends in order to familiarize yourself, but stop short of creating an itinerary, especially before you get there. 

There are of course some things that you have to plan, but generally the only thing I plan ahead of time is my mode of travel. I book a flight, or a train, or a rental car...etc. For some trips, including business trips, its also best to book a hotel in advance, but particularly for Germany I decided not to book any hotels in advance. Nowadays its quite easy to book hotels online even the day of or the day before. Booking late in the game gives you the freedom to change your plans without having to cancel or reschedule previously booked hotels.

Planning too far in advance tends to lead to frustration and failure. Its hard to predict whats going to happen while you're on the road. Weather changes. Flights get delayed. Friends get sick. Or you hear about an amazing town to visit, or stumble onto a trail that you want to hike. Having the flexibility to account for those changes can make all the difference in how much you enjoy your trip.

If I had planned my trip to Germany in advance, I wouldn't have visited either Oberstdorf or Berchtesgaden, two of the most beautiful places I've ever been, because I wouldn't have known about them. Hearing about them from friends and people I met in the area compelled me to go there, which really made a huge difference in my trip.


Familiarize Yourself with Where You're Going

Even though I don't create an itinerary, I do try to learn a bit about where I am going and roughly what I want to do there. I usually start by asking a few people that have been there. My goal is to come up with a list of places to start with. A bar, a coffee shop, a landmark, a park, etc. Those are my fallback points if I get stuck, or my places to look out for while roaming around.

Right before I get somewhere, either in the airport or on the train, I'll pull up Wikipedia and read about the city. Read the history, the geography, the key places. Its helpful background information to help you know where to look or when to change directions and head towards something more interesting while exploring.


Have a Routine

I try to keep to a routine when I'm traveling. I like to get up early, most of the time. Sometimes its nice to sleep in after a long day, but don't do this every day. I usually start out with a shower and a good breakfast. Sometimes I'll just eat something small in my hotel to get started, and then find a place nearby that serves breakfast. In the US, this is usually a coffee shop or restaurant. In Germany, this tends to be a bakery.

At the end of the day I make sure to clean out my pack of trash and make sure things are organized. I will unpack things like clothes and leave them in the hotel, but I usually take things like my computer and camera around with me. I make sure all of this is organized so that its both easy to go out in the morning, and also to minimize the risk that I lose something outside or in the hotel.


Take Pictures

This almost goes without saying, but whenever you're traveling be sure to take some pictures. I like to use both my iPhone and DSLR while traveling. The iPhone helps make sure some of my photos are geotagged, and also makes photos easier to share. The DSLR is higher quality, but not always as quick to access. To make the DSLR a bit easier to access I use a Peak Design Capture camera clip. I've found that its just about the perfect travel accessory for the traveling photographer.


Travel is a very personal experience. Some of these tips may not work for you, and thats ok. But in general, I've found that packing light and keeping an open mind while on the road has helped me to enjoy the experience of traveling a lot more. I hope that it will for you as well.

MMRecord Turns 1.3.0

MMRecord reached another milestone today as it was updated to 1.3.0. This is the second major update in 3 months, and includes a few fixes from 1.2.0 as well as a few handy new features.

A key feature in the latest version is the addition of two new MMRecordOptions blocks. MMRecordOptions is a little-known feature of MMRecord that provides some specialized request parameters that allow you to customize request and parsing behaviors.

MMRecord now includes the ability to inject a primary key for a given record into the request via an optional block. This is a handy option because sometimes an API response doesn’t include a way to uniquely identify the item. Sometimes this happens when you use a certain identifier to request a resource, but that identifier isn’t returned as part of the response. The optional primary key injection block allows you to pass that identifier back into the response parsing process to act as the primary key, or to create your own key if you need to. Most of the time you won’t need this, but when you do need it it should prove very useful :)

A popular request has also been support for AFNetworking 2.0. MMRecord has always provided implicit support for AFNetworking 2.0, because the library is designed to work with any networking library. We’ve used AFNetworking 2.0 and MMRecord on a few projects here at Mutual Mobile, but we haven’t had a subspec or example that specifically shows how these two work together. Thats all fixed in MMRecord 1.3.0, and a new AFMMRecordSessionManagerServer subclass of MMServer has been added as a subspec that implements the MMServer interface using AFNetworking 2.0. You can use this as is for simple use cases, or customize it for more complex ones as needed. And of course, the AFMMRecordResponseSerializer introduced in MMRecord 1.2.0 is still here as well.

Its still great seeing the feedback from folks on MMRecord. Try out the new features and let me know what you think!

Two Things I Learned about Interactive View Controller Transitions

The new Interactive View Controller Transitions introduced in iOS 7 are easily one of the most exciting APIs introduced in a long time, but they've also proven to be one of the most confusing and difficult to use. Part of the problem is incomplete documentation, a lack of solid examples, and unexplained and unknown corner cases. I encountered two of these today that I want with people.

I've been struggling for a long time with an interactive transition in my fitness app, Runtime. The app uses a UIPercentDrivenInteractiveTransition to allow the user to swipe to dismiss a detail view showing a map and other information about their run. The interactive portion tracks your gesture very well. But when you lift up your finger the view then snaps abruptly into place. For several months I couldn't figure out why.

The best information I'd seen on this was the objc.io paper. But even that didn't solve my problem. Then I ran across the Apple Tech Talk lecture on Architecting Modern Apps. This video (part 1) is easily the best explanation of implementing interactive transitions that I have seen so far, and while it gave me inspiration to try again and solve the problem, it didn't provide a definitive answer.

I had a twitter conversation with my friend Elfred today and I became more or less convinced that the issue was in my implementation of the transition itself. So I started going through it and experimenting a bit to see if I could figure out what was wrong. Here's what I learned.

1) UIPercentDrivenInteractiveTransition is so amazing and convenient because it captures your UIView animation block and interpolates the animations inside of it based on the percentage of your gesture. This saves you a ton of math in practice and is actually quite helpful of Apple to include.

However, there's a pretty big and undocumented gotcha. While their implementation will look for and interpolate between any and all UIView animation blocks defined within the animated transition's -animateTransition: method, it will only interpolate between the FIRST animation block it finds when CANCELING OR FINISHING the animation! This means that if for some reason you defined two blocks, and the bulk of your animations were in the second one, then you'd notice an annoying snapping effect.

The fix for this was simple: consolidate the animations into one block (don't ask me why there were two to begin with). But you can imagine how difficult this was to figure out, since the interpolation worked as you would expect while updating the transition. It wasn't until the transition cancelled or finished that the problem occurred.

2) While the new springy UIView animation method is quite cool, and works very well with normal animated transitions, it does not support cancel or finish interpolation within a UIPercentDrivenInteractiveTransition. Again, we see the same behavior as above, where the interpolation whilst updating the transition's progress works fine with a spring animation. But when you go to cancel or finish that transition, the views will simply snap to their places. Using a normal UIView animation results in the desired behavior.

Eventually I hope to open source the transitions I'm using in Runtime. They're still a bit too specific to the app itself, but once I have them cleaned up I'll post them. Until then, I thought I'd share what I learned today in the hopes that it will help someone else struggling in the murky waters of this delightful yet confusing API.

Runtime Updated to 1.0.4

Runtime shipped a few months ago and its gotten a great response. Its been featured on the App Store's Best New Health and Fitness Apps for nearly two months now. Its very exciting to see many people are actively using it. Ive gotten some great feedback from folks which has been the driving force behind the new update to 1.0.4.

One of the earliest feature requests I got was for exporting GPX files. Initially I only supported KML files because thats what Google Earth uses, and naturally I assumed this was the standard for GPS route file formats. It turns out thats not really the case. GPX files are much more widely used for all sorts of things, ranging from adding routes to a backpacking GPS device to geotagging your photos. 

Fortunately, adding support for GPX files was very straightforward because I had actually already built this for myself :)  Xcode supports simulated location tracking using waypoint-based GPX files, so I had already written a GPX file exporter for my own testing purposes while building the app. I just hadn’t chosen to publish it as a feature.

Many other apps (including some popular geotagging apps) use a track-based GPX file. So I ended up adding support for both waypoint-based and track-based files. You can now export your Runtime routes as a waypoint file for use with Xcode location simulation, or as a track file for use with many popular geotagging utilities.

Another request I got was to add a privacy policy to the app. Runtime uses very basic analytics to see how certain features are used in an anonymous way. This is a pretty common practice that helps developers better understand ways to improve their app. I was very careful not to record any personal information. Locations are the most sensitive and they are not recorded at all, and neither are names of run locations, notes, etc. What is being recorded is data about how often each feature is used.

Here’s an example to give you an idea of what happens with this data. I know that less than 5% of users are using the interval timer feature. I was thinking about spending some time working on that feature when I got some requests for GPX file export support. It was easy to use those requests to make the decision to build that feature, instead of spending time on intervals, because I knew the interval timer wasn’t being heavily used.

Another feature I added is one that I created mostly for myself, but which I imagine will delight many people. About a month ago I went for a hike and I pulled my phone out to take a picture. Runtime was recording my hike in the background. When I opened the Camera app my phone crashed and restarted itself. As a result my entire hike (which was about half way over) was lost.

I felt pretty bad about this, not just because I had lost data, but because I knew if this frustrated me it would definitely frustrate other people. There’s plenty of reasons an app could close in the background. Lets say someone was going on a 12 hour hike, and their phone ran out of power at 12:01. Its not fair to them to jettison all of their data from the last 12 hours because their phone turned off. Users don’t expect for an app to lose their data, no matter what happens.

To address these issues I implemented a form of State Restoration in Runtime. Runtime will now continuously record your route and save it to disk periodically in the background while you run. If the app is closed during a run, the half-saved route is detected when the app next launches, which gives you the opportunity to either save what you have, or resume from where you left off.

For the technically curious, this feature uses a separate Core Data persistent store for the route thats in progress. That way, if the user cancels their route, you don’t have to do any management of your primary store to remove that data; you simply throw away the temporary persistent store. When the user saves their route, the objects get migrated over from the temporary store to the main one. This is a practice that was highlighted this year at WWDC which seems to work quite well.

I’m just as proud of this feature as I am some of the little UI flourishes in the app. Its something most people will never notice, but that if they do will prevent them from being heavily disappointed.

The last thing I changed is fairly minor, but bears mentioning. Initially I had the Tweet and Facebook sharing options include an @mention to the app’s Twitter account or Facebook page. I decided that this bit of self-marketing is kind of silly, and unnecessary, and so I removed it. The Facebook and Twitter sharing options should really be all about what the user wants to share: the run they just went on. I still want a way for people to tell others about the app, so I added a new “Share Runtime” option in the menu. If people like the app, they can use this to specifically tweet or post about it. I also added a link next to it for writing a review, so that if people like the app they can easily do that too.

Runtime 1.0.4 is now available on the App Store. Please check it out, and if you like it tell your friends and rate it on the App Store. If you'd like to try it for free before you buy, feel free to check it out here at app.io.

MMRecord 1.2.0

2013 was a great year for MMRecord. The library transformed from internal tool to successful open source project and has received some great feedback by many people using it in their applications. It continues to be widely used within Mutual Mobile for our projects that use Core Data. And its almost up to 400 stars on GitHub (w00t!).

I'm releasing a new version with a couple of new features and improvements. Please check them out below.

1) AFMMRecordResponseSerializer

The details of the AFMMRecordResponseSerializer are described in detail at the Mutual Mobile engineering blog, but in short, this is an extension to MMRecord and AFNetworking 2.0 to provide a response serializer that returns parsed and populated MMRecord objects in an AFNetworking success block. AFNetworking is a fantastic networking library and this extension makes it even easier to use MMRecord alongside it.

2) Orphan Deletion

Orphan deletion has been a long time coming. This is actually a very hard problem to solve in a generic way, but I think we have a good solution. The way it works is users of MMRecord can supply an orphan deletion block that will be called once per orphan that MMRecord detects. An orphan is defined as an object of a given entity type that exists in Core Data but was not returned by the API response that MMRecord just parsed. Instead of deleting all of these orphans categorically, MMRecord will call the orphan deletion block and allow the user to return YES or NO if it wants that orphan to be deleted or not. The block contains plenty of data to allow the user to make an informed decision. 

Advanced users will note that the NSManagedObjectContext is also passed into this block. This allows you to gain direct access to the context after population and before it gets saved - allowing you a very high level of control over the results of a parsing operation. With great power comes great responsibility, so think about your problem twice before resorting to context manipulation.

The new version also includes a subtle change to the MMRecordMarshaller class. The marshaller now exposes a new method called valueForAttribute:rawValue:dateFormatter:. This method is intended to be subclassed and can be used to more easily customize the way the marshaller formats data that gets populated on a record. Before you would have had essentially copy paste the contents of the original marshaller implementation into yours in order to do this, which is obviously not ideal. Hopefully this change will better address that need of some users.

Finally, I wanted to thank some of the community members who have been so generous of their time and thoughts in helping to make MMRecord better. Thanks very much!


Lars Anderson

Rene Cacheaux

Kevin Harwood

Swapnil Jadhav

John McIntosh

Luke Rhodes

Matt Weathers

Alex Woolf


Cameras as a Means to Create Long-form Photography

People always ask me if I think the camera's days are numbered. As both an iOS developer and semi-professional photographer, you can bet that I have an opinion on the matter.

Watching the progress of photography through the last 15 years has been extraordinary. I started out shooting film, owning both a Canon AE-1 and the great-grandfather of Canon's consumer DSLR's, the Rebel G. I started shooting College Football at the peak of the transition to digital in 2005. My favorite picture of Vince Young was made with a Nikon D70 and a Sigma 120-300 f/2.8. Now when people see it on my lock screen, they ask if I took it with my iPhone.

There is no doubt that the quality of smartphone cameras, especially the ones on the iPhone, have become very good. But certainly the key to their success has been connectivity. Everyone who uses Instagram, Twitter, Facebook, Flickr, etc. has noticed this, but Craig Mod describes the phenomenon well in his article Goodbye, Cameras in The New Yorker.

One of the great joys of that walk was the ability to immediately share with family and friends the images as they were captured in the mountains: the golden, early-morning light as it filtered through the cedar forest; a sudden valley vista after a long, upward climb. Each time, I pulled out my iPhone, not the GX1, then shot, edited, and broadcasted the photo within minutes.

The smartphone has been key in enabling the short-form of photography. As Mod describes earlier in his article, photography used to be a painstaking process. Ansel Adams would work all day to capture a single image. The smartphone camera is always with you, is easy and fast to use, and enables streamlined sharing with friends and family. In the same way that mobile has enabled us to share our thoughts quickly in short-form, the smartphone camera has made it easy to quickly share a short-form image.

I'm using the analogy with long-form and short-form writing intentionally, because it is commonly agreed that one is not better than the other. They simply serve different purposes, which is exactly how I feel about photography. Smartphone images are not bad images. They are artistic, emotional, provocative, engaging. All of the qualities of any good photograph taken in the last hundred years. But they serve a different purpose than the long-form version of photography where images are made with a purpose built camera. Quoting from Craig Mod again on the shift to networked cameras.

In the same way that the transition from film to digital is now taken for granted, the shift from cameras to networked devices with lenses should be obvious. While we’ve long obsessed over the size of the film and image sensors, today we mainly view photos on networked screens—often tiny ones, regardless of how the image was captured...

The distinction of a long-form photograph is how the image wants to be remembered. We view millions of images on our phone's small screen, but how often do we view them a second time? Will we cherish the images taken with our phones five years from now? Speaking personally, I rarely spend time with my iPhone images on a computer after I've shot them. I enjoy and share them on my phone, but thats it. I don't return to them later.

Cherished memories are a very important function for a photograph. This article from Manton Reece on Quality Photos really hit home for me.

We don’t use our DSLR every day. It’s for big events, birthdays, school performances, and the iPhone suffices for the rest of the time. But it’s worth every penny and more, to look back on these photos years later and know we have captured them at their best.

This summer I spent 16 days hiking the John Muir Trail in California. I carried with me a Canon 6D, Canon 24-105 f/4L, Canon 300 f/4L, a variety of filters, remote timers, batteries, and 178GB of SD cards. That added about 10 pounds to my pack. I was already carrying my iPhone 5, so why bother with all the extra gear? I considered leaving it, but in retrospect I could not be happier that I kept it. The trip turned out to be one of the most creatively stimulating experiences I've ever had as a photographer. I came away with dozens of images that I will cherish forever. I ended up printing two books and a dozen large canvases, enough to decorate my home-office with memories of the trip.

I did still take pictures with my iPhone along the way. And on the few fleeting moments that we got a cellular connection I managed to share some of those images on Twitter. But when I look back through the images of the trip, none of those are the ones I cherish. I was happy to be able to share my trip immediately with my friends and family, but they are not the images I want to go back and enjoy later. They look great on my phone, but they don't compare well on a large monitor or in print.

There are plenty of examples in photography where the DSLR will remain essential for a long time. Sports and Wildlife are good examples, as they require very specialized lenses that will not be available on a smartphone. But even for other photographic genres that are less dependent on focal length I continue to believe that there is a place for both short-form and long-form photography. Mobile has opened up the short-form and made it accessible to everyone, but it has hardly killed the long-form. There is still a place for cameras that enable long-form photography, as long as people have memories that they wish to cherish.

Challenge

When I was younger I was really intimidated by the prospect of hiking ten miles. Much less twenty, or thirty miles. I would say to myself, a year ago I hiked ten miles and it took all day. Why would I think about hiking twenty? But I learned that as long as I was willing to start, that all it took to finish was having the enthusiasm to continue.

Hiking a mountain doesn't start off as a painful process. The foothills are usually shallow, and you usually have to cross a few streams and meadows to get to there. But once you start going up the pain eventually finds you. Your legs tire and your back starts to ache. Breathing is harder and your feet become sore. Eventually, your entire body is telling you to stop. But if you want to finish you have to keep going.

Putting aside physical pain and mental discomfort is an incredible challenge for many people. It's also an essential part of overcoming a mountain. Climbing a mountain takes hours, or even days, and much of that experience will not be comfortable, and some of it may be quite painful. The only way to overcome it is to become so singularly focused on your objective that you can ignore the parts that are telling you to stop. How you confront that challenge will tell you a lot about who you really are. 

This summer on the John Muir Trail I met a fellow thru-hiker at the top of Seldon Pass. She was a 68 year old grandmother and mother of 3. And she was hiking all 211 miles of the John Muir Trail by herself. We talked for a while that day. She kept up with us down to Muir Trail Ranch. At that point, another hiker asked if she wanted someone to hike with her for the rest of the trek. But she said no. She explained that this challenge held a special meaning for her. Her whole life she had been surrounded by people, by family. So when she set out to hike the JMT she told her husband of 40 years that this was a challenge she had to undertake alone. She wanted her challenge to include the feeling of isolation, and discover on her own how to face it, even if others thought it impossible. 

Sometimes overcoming a challenge yields a very tangible reward. Passing a test. Improving a score. Finishing a project. Shipping an app. Life is full of these sorts of challenges. But sometimes these challenges that seem simple become the hardest to overcome. It's at these times that we need confidence. Confidence that anything is possible if you set your mind to it. 

Completing a physical and mental challenge like climbing a mountain is all about gaining that confidence that you can overcome any challenge. It will remove the notion from your mind that something is impossible.

Mind over Mountain

I've always enjoyed the outdoors. The solitude that can be found in nature is nearly impossible to find in the city. But even more than solitude I find strength in nature, an inner strength that has little to do with physical ability. Its a mental strength that can only be found when one has gone beyond what is comfortable and finds themselves alone in the wild.

Standing above the clouds where the air is thin and the trees are scarce is an experience known only to a few. It's a feeling of serenity, solitude, exhaustion, and triumph. Knowing what you overcame to get here, to be standing on the tallest point for miles and able to look out at the valley floor below you, and at all of the other peaks that stand nearly as tall around you. But sadly your journey is only half finished, because you still have to make it safely down.

Climbing a mountain is a challenge unlike any other. It's a test of endurance as well as strength. It requires agility and also speed.  The trail is generally very long, often 10 or 20 miles. To many that number may seem impossible to overcome. Climbing a mountain is more than a physical test. Your muscles alone will not save you from the fear and uncertainty that come from even contemplating this trek. The greatest challenge is not having the strength to finish, but simply having the will to start. Then you look up and see the towering mass before you rising up thousands of feet into the clouds. This is definitely a challenge worth starting. 

Your first step into the outdoors will be an uneasy one. You won't be sure what you should take with you, or how far you can go. This is where it's important to start pushing yourself. Leave your extra shirt at home. Don't take two jackets if you only need one. Soon your pack will be lighter, and while you may be nervous that you aren't prepared, you'll be able to travel farther. Then one day the temperature will drop and you'll wish you had that extra jacket, until you realize that wrapping up in your sleeping bag keeps you warm by the fire. How you handle an uncomfortable situation is often more important than the gear you bring with you.

What I've found while climbing mountains is the mental strength that tells me one simple thing: that I can do anything I set my mind to. Climbing mountains is intimidating. It's scary. But overcoming that fear is so rewarding, and it will change your life forever. All it takes is the will to start.

Forward - Climbing Mountains

I started writing this article about two years ago. I’ve spent so much of my life hiking and backpacking, and I wanted to write about what it means to me. But I struggled with it, and kept delaying finishing writing the article.

The wilderness is a wonderful place. The beauty that can be found in nature is almost impossible to describe. Even photos really don’t do it justice. But whats harder to describe is the impact the experience can have on you. Ultimately, it was this impact and what it means to me that I wanted to write about.

I decided to publish the article in two pieces. Mind over Mountain, and Challenge. The first one, Mind over Mountain, describes the challenge of climbing a mountain. The second one, Challenge, explains why that challenge is worth attempting and overcoming.

The mountains are a wonderful place worthy of exploring. If you have the chance to go there, I highly recommend it. You may find more there than you initially expect to.

Building my own New Mac Pro Part 1: Storage

For over a decade Mac power users have dreamed of an "xMac", a cheap bare bones Mac tower that users could buy and customize however they wanted. Its been clear for years that Apple has no interest in building such a device, as evidenced now by the "New Mac Pro", in its tubular design that pays homage to the much beloved G4 Cube.

Usually that left Mac power users opting for whichever pro tower Apple was currently shipping, be it a Power Mac or a Mac Pro. But with the new Mac Pro we are seeing a different trend. The Mac Pro line is no longer the best choice for power users of all sorts. In many ways it truly is the first "pro" Mac targeted directly at users of pro apps like Final Cut Pro X.

I've been a Mac tower user for almost 10 years. I used a Power Mac G5 for over 6 years, and I'm at over 3 years on my 2010 Mac Pro. 3 years can be a long time for a computer of any sort, but one thing I love about the Mac towers is that they tend to remain useful for quite a while. Part of that is their expandability and upgradability. You can add all sorts of new gizmos and gadgets to a Mac tower, including hard drives, graphics cards, tons of RAM, PCI cards, etc. I upgraded my G5 a few times, and now I am in the process of extending my Mac Pro's life as well.

The key for me in deciding to upgrade my current Mac Pro rather than buying a new one was realizing that this Mac Pro is already my "xMac". It already has everything I want (and you can't beat the price)! Tons of internal storage. A fast processor. Lots of RAM. What it doesn't have, though, is a modern graphics card and fast PCIe internal storage. The main differentiators on the new Mac Pro (other than being the first Mac tower to have Thunderbolt or USB3, of course) are its incredible standard dual GPUs and blazing fast storage. Those happen to be two of the easiest upgrades to add to an existing Mac Pro, so I decided to turn my xMac into a New Mac Pro.

Once you compare cost of upgrading versus buying a new one, the decision becomes pretty easy. The new Mac Pro I would buy from Apple would cost around $6000 dollars. That gets you a 6-core processor, 1TB PCIe SSD, 32GB of RAM, and the D700 graphics card. And that doesn't include any of the additional cost of purchasing Thunderbolt enclosures for my existing internal SATA hard drives (another $700+ dollars). Not to mention a new keyboard and another DVI adapter.

Alternatively, the cost of adding a 1TB PCIe SSD to my Mac Pro is $1400. Internal storage speed is one of the weakest links in the old Mac Pro, and OWC's Mercury Acceslsior solves that problem in a very elegant way. It also adds fast eSATA connectivity as well. Upgrading the Mac Pro's graphics to a modern Nvidia GTX 780 is around $500. It wasn't always the case, but thanks to modern graphics drivers and recent OS X updates PC graphics cards are now plug-n-play in recent Mac Pros. The GTX 780 actually performs about as well as the D500 and D700 in the new Mac Pro, as can be seen by some of the recent benchmarks. Its a bit of an apples to oranges comparison, since the 780 is a gaming card, and the FirePro cards are workstation cards designed for maximum compute power, so it really depends on your application for which will perform better.

I haven't ordered the graphics card yet, but I've received and installed two PCIe SSDs from OWC. I installed them in a RAID-0 stripe configuration for maximum read and write performance over over 1000MB/s. Mac Performance Guide has an excellent review and guide for how to do this. Its also worth noting that when I move away from the Mac Pro to something else, I can bring these two ridiculously fast SSDs along with me!

The two apps I use the most for my work are Aperture and Xcode. I'm an avid nature and wildlife photographer and a part time freelance sports photographer. I'm also an iOS developer. Both of these tend to be fairly computationally demanding jobs, so having a good system is certainly of high value. I came up with a set of basic tests for both apps and ran them on my 3.2GHz 2010 24GB Mac Pro with its old SSD (OWC Mercury Extreme Pro 3G) and with the new PCIe SSDs. I also ran the tests on a 2.4GHz 2012 16GB Retina MacBook Pro as a control. 


Blackmagic Disk Speed Test

First, the speed test. Here's the original OWC Mercury Extreme SSD in the Mac Pro.

RAID.png

The results from this SSD really are not that impressive. Its entirely possible that this SSD is nearing the end of its life, though I have no way to tell. Its an older generation SSD which is no longer sold by OWC.

Here's one of the OWC Mercury Accelsior PCIe SSDs.

SSD.png

Wow. Thats a huge difference! More than 5 times faster. But thats only one of the PCIe SSDs. What about when you put two of them together in a stripe?

SSD STRIPE.png

WOAH! Thats almost twice as fast as a single drive, and almost 10 times faster than the old SSD. Thats a pretty serious upgrade in performance right there.

One quick note about striping. A RAID stripe can be a bit dangerous because of one drive fails, then the whole array fails. That makes it absolutely critical to have a reliable backup strategy. I use a combination of SuperDuper clones, offsite backups, and Backblaze to keep my photo library and data safe. If you're thinking about building a storage setup like this, please please please make your backup strategy a top priority!

And finally, here's what the MacBook Pro's SSD looks like. 

rMBP.png

400MB/s is very fast storage. And this isn't even a 2013 retina MacBook Pro, which also includes super fast 600MB/s+ PCIe storage. Apple's latest Macs are very impressive. This upgrade is all about getting the older Mac Pro up to the same level of whats possible with the latest hardware.


Aperture

My typical workflow with Aperture is simple. Import a set of photos into a new project. Organize, rank, and edit those photos. Then export them to send to a client, post on 500px, etc. So I built a basic test suite around those tasks, similar to what I did to test my original SSD nearly two years ago.

Aperture Import

For this test I imported 866 RAW images shot with a Canon 6D and 7D at the Formula 1 Grand Prix here in Austin Texas.

Import.png

The new PCIe SSD definitely helped, representing a 20% improvement for the Mac Pro. However, the Retina MacBook Pro still won in this test. If I had to bet, I would guess that the reason is due to the superior memory throughput of the rMBP, though I do not know for sure.

Aperture Preview Generation

For this test I forced Aperture to re-generate all 866 of the JPEG previews for the RAW files from the Formula 1 race. You can force preview generation by holding down option when selecting the "Update Previews" command in Aperture.

Previews.png

I added a 4th comparison for this test, placing the test Aperture library and photos on an internal 4TB RAID Mirror that represents my photo archive. That volume experienced the slowest results. In this test the new PCIe SSD volume made a huge difference, besting the others by nearly a full minute.

Aperture Image Export

JPEG image export with Aperture is a strange test. Its not immediately clear what helps improve the results on this test, but my hunch is graphics. The CPU is almost never maxed out on this test, but graphics RAM, and system RAM, usually is. I was curious what impact, if any, fast storage would have here. For this test I exported all 866 images as full original quality JPEGs.

Export.png

The MacBook Pro won again, but the SSD upgrade did make a bit of a difference. This marginal gain is about what I was expecting. I'll be more interested in the results of this test after completing the graphics upgrade in the near future.

I ran a few other informal Aperture tests. In my original SSD Aperture test last year I tested how long it took to load all photos and all projects. Starting up Aperture on the SSD took 10 seconds. On the PCIe SSD thats cut down to 3 seconds. Loading all photos took 12 seconds on both an SSD and a HD. Well, guess what, it took 12 seconds on the PCIe SSD as well. Loading all projects, however, was dramatically faster. On the original SSD it took a very perceptible 8 seconds, but on the new PCIe one it was a barely noticeable 1.85 seconds. These changes don't show much except that to point out that a very fast random access volume makes a perfect storage system for an Aperture (or I assume Lightroom) library to sit on. Browsing through projects and images is extremely quick because the database lookups are so fast. Thats one reason that these PCIe SSDs are game changes for the server industry, and why I feel like they will improve the responsiveness of my computer by a good bit.


Xcode

The only real test I could think of for Xcode was how fast does it produce a clean build of a project. For a test project I selected a fairly large and complex project I've been working on. It includes well over a thousand source files, several third party libraries that are built from source, plenty of assets to copy over to the bundle, etc. Here's the results.

Build.png

Thats a pretty nice boost with the new SSD! Almost 6 seconds off a 30 second build. Informally I decided to boot up off of one of my backup volumes to see how this test ran on a spinning disk. One minute and 3 seconds! Fast storage seems to make a pretty big difference as far as Xcode compilation performance is concerned.


Photoshop Speed Test

The last test I ran is the 'Real World' Photoshop speed test that can be found here. The test uses a test photo of an eagle and runs a series of photoshop actions on it.

Photoshop.png

Photoshop very clearly benefits from super fast storage that it uses as a scratch volume.


Gaming

I didn't run any formal gaming benchmarks, but I did fire up a few games to see if there was a perceivable difference. Level loading performance felt much faster, and on the few games I have that can display a frame rate, I was noticing 10-20 fps higher than I typically do. That was on the same medium-high settings that I am accustomed to on the older Radeon 5870 graphics card.


Conclusion

In reality, a new Mac Pro would probably still be faster than what I've built. But I'm not convinced that it would be a better value. By upgrading my old machine I've been able to measurably improve its performance at a reasonable cost while maintaining some of the attributes of the machine I most appreciate, like massive internal storage. With an affordable graphics upgrade this performance may improve even more, and with a OS X graphics drivers update I might be able to run 4k displays with that card as well! Only time will tell, but for now, I am quite happy with my new xMac that I built :)


Developing for the M7

I was already well into developing Runtime when the iPhone 5s was announced and we learned about the new M7 "motion co-processor" from Apple. There have already been a few good articles talking about what the M7 does and how we believe it works, but essentially from a developer's perspective the M7 provides a great way to track a user's steps and type of activity while they are moving. Instead of writing about what the M7 is or how it works, I wanted to write about what its like to use as a developer.

The M7 API is part of the Core Motion framework. Tracking a users steps and activity has always been possible by using Core Motion, but it was much more difficult, and required much more power. Instead of trying to calculate this information ourselves using data directly from the accelerometer and gyroscope, we interact with two new classes that give us this data directly.

Steps

The first one, CMStepCounter, provides us with the number of steps the user has taken while carrying the device. There are only a few methods here. There's a class method to tell you whether or not the device supports step counting, aka whether or not the M7 is installed. There are two methods for starting and stopping step updates. And then there is a method to query the history of steps taken with a  start and end date.

Lets talk about getting step updates first. While your app is running you can ask iOS to execute a block every time a certain threshold number of steps is reached. Runtime uses this method to update the Stopwatch screen while the user is running. From my experience, the updates are delivered about when you would expect them to be.

Stopwatch.png

There is also a query method to look up the number of steps during a certain time frame. The M7 stores 7 days worth of data, so the window can be any period during that 7 days. The most surprising thing to me about this API was how fast it is. Querying even an entire week worth of step data takes virtually no time. Despite this, you still have the option to specify a specific queue to have the block executed on. You can specify the main queue if you want the callback to be synchronous. If you're going to be updating the UI with the result, you might as well just do that. If you're performing some other type of calculation with the result, then perhaps you might want to use a background queue.

Activity

Next up with activity tracking are two new classes, CMMotionActivityManager and CMMotionActivity. The activity manager follows the same pattern as the step counter, with a class method to determine availability, and block-based methods for updates and queries.

In this case though, the query and update callback blocks behave slightly differently. The query block returns an ordered array of CMMotionActivity objects. The activities are ordered by time based on when they occurred in the specified window of time. This is very similar to the new CoreLocation deferred location updates method, which returns a list of location updates in a similarly ordered fashion. The update callback block instead returns a single CMMotionActivity object, and gets called repeatedly each time the activity changes.

CMMotionActivity objects encapsulate what type of activity has taken place, be it running, walking, standing, driving, or an unknown type of activity, as well as the system's confidence level that it has correctly identified that activity. One thing that can be kind of funny when you start looking at the data is when you see an Unknown activity type with a low or high degree of confidence. That means that iOS is either sort of sure, or absolutely sure, that it has no idea what you are doing :)

One pattern I've noticed with the data is how it transitions from low, to medium, to high degree of confidence for something like walking or running. There tends to be about 5 seconds worth of low confidence, about 5 seconds worth of medium confidence, and then an extended period of high confidence if you maintain the same type of activity for a long time. Below is a screenshot of a test app I wrote to take a look at the at a being returned when running a query for activities over a certain period of time. Red represents low confidence and green represents high confidence. The period of time below is me shuffling through the throng of people at Circuit of the Americas after the US Grand Prix last Sunday, which is why its slightly chaotic.

Activities.PNG

Overall I feel like the activity data is extremely accurate. I've tested it out pretty thoroughly with Runtime on a few runs here in Austin, and out in New York's Central Park. I've stuck with the low thresholds for running and walking, because even that seems to be pretty accurate for my needs. Here's a screenshot from Runtime showing the different activity types during one of my runs. The time I spent running is highlighted orange, while the time spent walking is highlighted yellow.

RuntimeActivities.PNG

To build this feature in Runtime I used the query API, and simply query the activity type for the start and end time of a user's run. I can then iterate through the returned activities to determine how to highlight the route the user took out on the trail.

Conclusion

Both APIs are very nicely designed block-based interfaces. In some ways I look at this as the next evolution of Apple's API design patterns. A class method to determine whether or not access is available. Update methods with a callback block. And query methods with a callback block. They're very clean, functional, and easy interfaces to use.

The data also appears to be highly accurate. The activity detection in particular is basically dead on for distinguishing between walking and running. I think the accuracy may vary slightly based on how you hold your phone, but with it in my pocket or in an arm band I have noticed very high accuracy levels.

If you're considering adding support to the M7 to your app, hopefully this will help point you in the right direction. I think its great that more apps beyond fitness apps are beginning to use the M7. One example is Day One, the excellent journalling app for iOS and Mac, which lets you add your step data to your journal entries in their latest update. I desperately wish I'd had an iPhone 5s during my John Muir Trail hike this summer, so that I could have used this feature!

The M7 is a great new feature for iOS and something that can help build a better experience in your app by giving the user access to move information about their physical activity. Its a great new feature, and a fun API to use.