The story of Grocery 2.0 begins around Christmas of 2017 with a family recipe book.
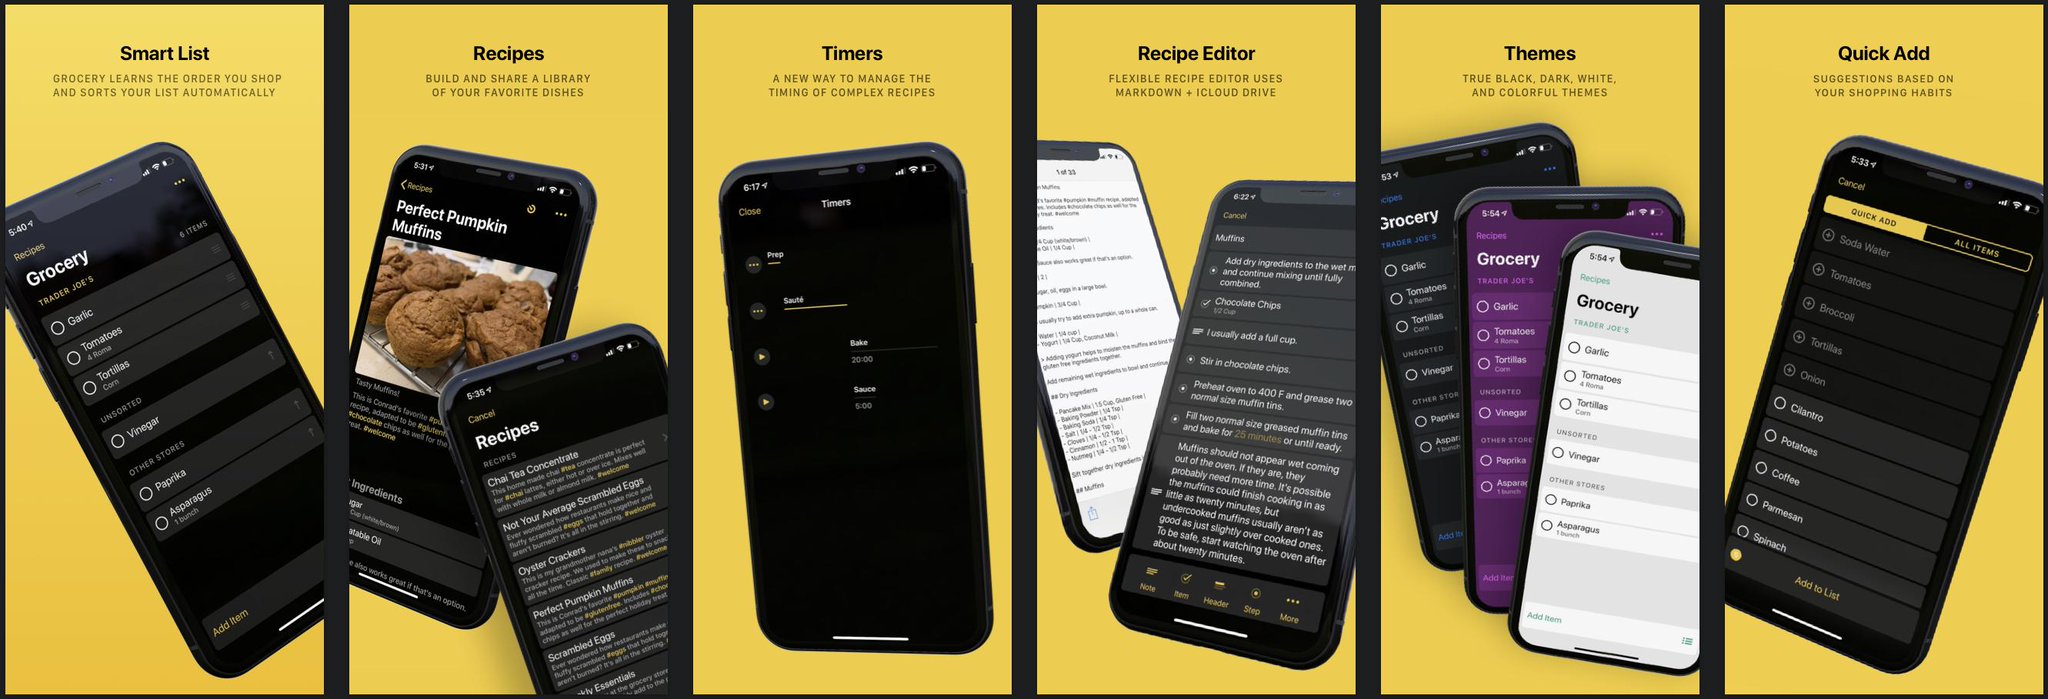
Grocery 2.0
Ryan and I were back home with our families looking up recipes and planning holiday meals. After picking a recipe to make you typically add the ingredients to your grocery list and go shopping. We both wanted to have our recipes in Grocery to make adding those sets of ingredients easier.
I think it's important that this realization happened with family recipes because family recipes are very special. To many people, they’re as special as family photos: passed down generation to generation. If we added recipes to Grocery it would need be a great recipe feature that we could trust with those recipes. We set out to do just that and started design in January of 2018.
The obvious next step after design would have been to hit File -> New View Controller in Xcode and start adding a recipe screen to Grocery. Instead, we created an entirely new Xcode project to iterate quickly on our recipe concept. Our goal was to prove that our design worked and bring what we learned back to Grocery and quickly ship our recipe feature.
We eventually did bring that recipe feature back to Grocery and we’re excited to be shipping it in the app today! But along the way, we also re-wrote virtually all of Grocery’s UI in a way that greatly improves the consistency of elements throughout the app, as well as how code is structured for re-use across screens.
One way to look at it: Version 1.0 was basically our prototype. Version 2.0 is the real deal.
That probably sounds weird if you've already been using 1.0 and love it. We love it too! But for multiple technical and user experience reasons I can safely say that 2.0 is a huge improvement, not only to the experience of using Grocery but also to its technical future for many releases to come.
What’s the deal with a new Xcode project?
I initially resisted adding recipes to Grocery because I was in love with the idea that Grocery is just a simple shopping list. Building recipes seemed incredibly complicated. You need a list to view all your recipes, a recipe viewer for cooking and selecting ingredients, and an editor to create new recipes. You need a place to safely store all of the recipes a user adds, with all of their section headers, ingredients, steps, notes, timers, and photos.
Using a new Xcode project gave us space to work through design and technical hurdles without worrying about breaking Grocery. Once we had the new project we started attacking all of the problems involved with building recipes:
1. Using Markdown as a storage system for recipes
Our entire concept for recipes hinged around using markdown to improve flexibility for displaying recipe content. We wanted our recipes to stand the test of time with an open document format that supports interleaved ingredients and steps.
Testing this theory in the new Xcode project proved that a basic UI for creating recipe-focused markdown files was easy to use for adding recipes. ✅You can read more about the recipe markdown format we arrived at on GitHub.
2. iCloud Drive
Recipes need to be shareable across devices and with friends and family members. But we weren’t sure how well recipes sync between devices if we stored our recipe markdown files in iCloud Drive.
We tested this feature by adding support for reloading a recipe in real time as changes are made on another device, which actually works VERY well! Syncing is surprisingly quick.
3. How to support multi-line text in list cells
Multi-line text has always been a challenging problem because every cell in your list could have a different height.
Grocery 1.0 supports Dynamic Type, which requires some variation in the height of each cell, but we still limited the length of items in the list to a single line. That would never have worked for recipes that usually include long steps that span several sentences.
So instead of a standard table view, we built the recipe screen as a collection view and worked through all of the details to get multi-line text working. Our solution worked really well for recipes, and we even made the solution re-usable so that we could use it in other screens like the recipe list and ingredients list.
4. Themes
We'd been wanting to introduce different app theme colors for a long time. Because why not?

Themes!
Building new UI components from scratch in the new project seemed like the perfect time to try it! We ended up with a very clean solution using a notification system that lets each component style itself for the selected theme. We even used Swift enums for all of the theme options!
We had assumed that there would be a new system dark mode setting in iOS 12 that we'd be well on our way to supporting, but that only debuted on the Mac. We'll be ready if that ships in iOS 13 though!
What else did we get from a new project?
Using a new Xcode project to develop recipes helped us solve a lot of problems quickly, but we actually got a lot more out of it than we could have predicted.
We eventually realized that our new Xcode project had essentially become a component-based layout system for building lists that fit our app's style. A component is just a collection view cell with enum-driven customization options like:
Title font style
Note font style
Left thumbnail image
Right thumbnail image
Full size image
Background visible or invisible
Attributed text (e.g. for timers and links)
Checkmark visible or invisible (e.g. for grocery list items)
Disclosure indicator visible or invisible

Example of most of the types of cell configurations that Grocery supports

All of these cells are actually the same type of component-based collection view cell
Each component supports theming and multi-line text for all of its labels right out of the box. Multi-line support also extends to images which are automatically sized to fit the width of the screen with their aspect ratio intact. The components were exactly what we needed to build a flexible recipe layout system, but also worked great for building any other screen we wanted to.
The recipe feature works! Now what?
Our original plan called for iterating quickly on recipes in a new Xcode project before bringing the recipe feature code back into the Grocery project. In my head that essentially meant moving some files from one project to another and linking them together to present the new recipe screens.
There still wasn’t anything wrong with that plan. Grocery was still working well, and we wouldn’t have to make any changes to Grocery before inserting the new recipes feature. There was essentially zero risk to Grocery by going this route. Why would we consider doing anything else?
The other option was to go nuclear and make some major code changes to Grocery itself, while moving the recipes from the new Xcode project back into the main Grocery project. There were a few reasons why this seemed like a great idea:
We were way more excited about the UI system we had created in the new project than we were about the UI we had created in Grocery. The code was a lot nicer to work with, and the components fully reflected our entire visual style for the app.
By this point we had committed to shipping new app themes alongside recipes, and our component-based layout system already supported theming.
We'd been fine tuning the marginal layout in the prototype and it simply felt nicer and more consistent than some of the layout in Grocery. We were building every new screen with these components, and so all of the screens benefited from those improvements.
The original Grocery project essentially used different table view cells for each screen. The Grocery List and Quick Add screens had different cells to accommodate one having a checkmark selection and one having a circle selection. There were different cells for settings too, and for lists and stores. This of course caused plenty of issues any time we decided to tweak our layout spacing in the app...which led to us not doing that very often. You never want brittle code to be a reason to avoid change, and our original layout code was too brittle for our liking.
Plot twist
Instead of just moving recipes back into Grocery and calling it a day, we decided to re-build the existing Grocery UI using the new component-based layout system without changing Grocery’s existing model layer.

Grocery List + Recipes
We still loved Grocery's internal model and controller layers. The interaction with Reminders, our internal sorting algorithm, Apple Watch, and the Realm database that we use for sorting were all very solid and abstracted out into their own classes.
The Merge
Besides support for themes, we also knew that two of the screens in Grocery needed to be overhauled before our next major version anyway: Stores & Lists, and Settings.
Stores & Lists:
Confusion about the difference between Stores and Lists and how to have items associated with a specific Store was easily the largest source of customer feedback from Grocery 1.0. We'd been brainstorming solutions to that almost as long as we'd been working on recipes!
The solution we arrived at was to merge Stores & Lists into one feature called Stores, and give each Store an assigned Reminders List. That gives users the flexibility to configure Stores however they want to: with a shared list for multiple stores, or a unique list for each store.
New Stores:
The new Stores feature was different enough from the original that it really needed a brand new UI no matter what. The original store/list selection screen just didn’t make sense for the new feature.
Building the new screens with the component-based layout system was incredibly fast! They were easy to build because the components handle all of the layout. The data source for each screen is essentially the a-la-carte counter at a restaurant:
"I'll take three cells with images on the left, titles, and notes on the right; a section header with some top spacing; two cells with some text and images on the right; one cell with two lines of note text; and two cells with tinted titles that make them look like buttons."
Settings:
We re-built settings in the same manner, and that only took a weekend to finish. Because the logic behind most of these screens is relatively minimal, handling all of the layout through shared components cuts out most of the work for adding new screens.
Of course, this component-based layout system only works within the constraints of what our shared components can be configured to do. Adding an entirely new "type" of component still means work. But knowing which components exist and how they can be customized is also really helpful from a design perspective because you have a better sense of what your palate looks like while designing a new screen. If you use those components in the design, you know it's going to be easy to build. It's really a tide that lifts all ships.
The Grocery List Refactor
Grocery is still a pretty simple app. When you exclude the Recipes, Stores, and Settings screens that we already re-built...the only thing left to rebuild is the list screen itself.
I have to admit, the list screen was a little embarrassing to behold. It was actually still called ViewController.swift from when I first created the Grocery Xcode project in January of 2017!
ViewController.swift wasn't quite as massive a view controller as it could have been, in part because of how much logic Grocery had abstracted out into classes that could be shared with the Apple Watch app. But it was still cluttered and disorganized and largely incompatible with the multi-line layout and theming features we were adding in 2.0.
The new list screen is infinitely nicer and actually has a real name: GroceryListViewController.swift!

GroceryListViewController + Extensions
Developing the new GroceryListViewController was an incredible lesson in refactoring that I want to describe for you here. This is what the process looked like:
The simple stuff:
Some pieces of the original ViewController had an obvious home in the new GroceryListViewController. If a method is simple and important, just putting it into a more organized place in the new GroceryListViewController or one of its extensions was all that was needed. I saw those pieces as low hanging fruit and tried to move all of them first.
Anything I moved to the new GroceryListViewController I also deleted from the old ViewController.
More complex parts:
Certainly some parts of the original ViewController weren’t needed anymore, or could be better replaced by newer components we’d been developing alongside recipes. After clearing out the low hanging fruit I started combing through the remaining methods following this pattern:
Select a method in the old ViewController.
Figure out what it's doing.
Write a new method in GroceryListViewController that implements the essential features of the old method, generally using newer support systems.
Delete the old method from the old ViewController.
As the ViewController file shrank, other files related to the new GroceryListViewController grew. The refactor would be complete when ViewController.swift was empty and could be deleted from the Xcode project.
Drag and Drop:
The most care was needed around features like Drag and Drop. Grocery's original table-view-based drag and drop was incompatible with the new iOS 11 Drag and Drop that supports dropping items from other apps. That sort of refactor required saving the underlying logic of what to do when an item is dropped while supporting a new type of user interaction.
Gaining support for features like iOS 11’s Drag and Drop was yet-another reason that I'm glad we decided to give the grocery list screen a do-over. Eventually the last method was removed from the old ViewController.swift and the file was deleted from the Xcode project. Refactor complete!
Once the refactor was finished, every screen in the Grocery project worked the same way. Having one way of doing things makes the app easier to maintain because there's less context switching across features, and less surface area for bugs to pop up. That by itself can be a very valid reason to perform a major refactoring effort if it means unifying the way core functionality in your app works!
Grocery list, recipes, and back again
A friend at work asked an important philosophical question recently: if you replace every plank on a ship is it still the same ship? Grocery still feels like the same app to me. Sorting the list and adding items still works the same way. Settings carry over to 2.0, with the addition of a few new ones. Quick Add works the same way. But using the app with recipes and themes is so much nicer as a user, and the code base is easier to work with as a developer. I'm not sure if it's truly the same ship or not, but I do know it's a ship I love using and working on!
We're really excited for people to try the new version and hope that you enjoy it. Grocery is free to download and available on the App Store!