Introducing Grocery - An Opinionated Shopping List App for iPhone and Apple Watch

I'm excited to introduce Grocery, a new app that Ryan Considine and I built specifically for grocery shopping with the goal of making trips to the store more efficient. We started the project with a question — what if our app knew the path we took through a store, and how would it use that to make the trip more efficient? What we are launching is a simple shopping list with a focused interface that includes a lot of intelligence to always keep your list sorted in the order that you shop.

Grocery for iPhone

Grocery for iPhone

Smart Sorting

Sorting a grocery list is no small task. There's no end to the variety of different ways that people shop. Paper lists are still very common, and people have different ways of manually sorting their lists. Grocery store layouts are almost as varied as individual people's shopping behavior — even among the same chain of stores. Some stores have tried to solve this problem with technologies like geolocation and beacons, but those are expensive to install, unreliable to use, and just haven’t caught on.

We wanted to build something that would be easy and reliable for everyone to use, regardless of store location or shopping habits. Our first step was to create our own intelligent sorting algorithm that can learn from an individual's shopping behavior. This is a new approach that we haven't seen applied before, but we chose to pursue it because it doesn't require hardware or analytics, or even a user's location to build a custom sorting order.

The algorithm we built learns from each trip you make to the store and sorts based on the order you shop for items and check them off your list. All of this analysis is taking place on the user's phone and stored locally. We aren't doing any machine learning in the cloud — not just for privacy reasons, but because there's no need. Everyone shops differently, and we don't need to learn from someone else's behavior to build a better sorting order for you.

Let's say you make a trip to the store for a few essentials, in this case:

  • Eggs
  • Milk
  • Avocados

You move through the produce section of the store first, and this was the order that you picked up the items and checked them off your list:

  • Avocados
  • Eggs
  • Milk

From now on, Grocery knows that Avocados come before Eggs and Milk. The next time you go to the store and only need to visit the produce section, but added a few new items to your list:

  • Kale
  • Carrots
  • Onions
  • Bell Peppers
  • Avocados

After this trip to the store, Grocery knows how to sort all of these items relative to each other, and because you previously shopped for Avocados, it also knows that these items all come before Eggs and Milk. If your next trip to the store is for Kale and Eggs, Grocery will know which item comes first and sort your list accordingly.


Apple Watch

Grocery for Apple Watch

Grocery for Apple Watch

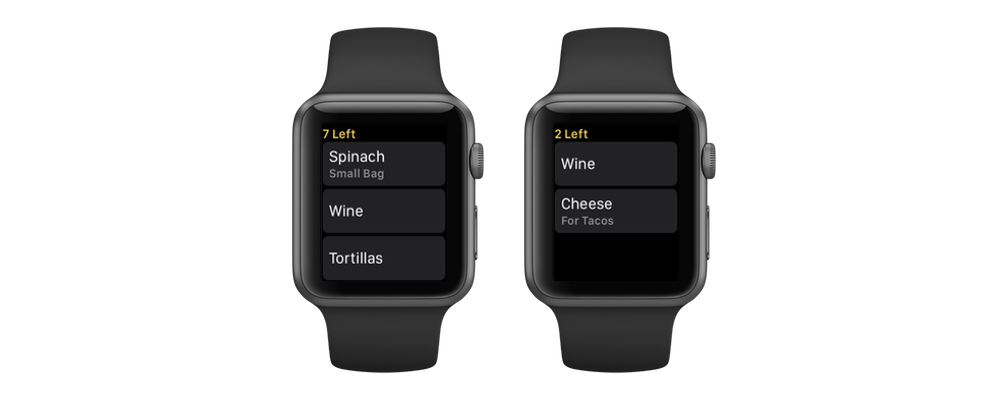
Efficiency in the store is our number one goal for Grocery, and an even more efficient place for the app is on the Apple Watch. We learned early on that the Apple Watch was a great device to use at the grocery store because it keeps your hands free to hold items or push a shopping cart.

We wanted the Apple Watch experience for Grocery to be the best possible. To that end we actually built the Apple Watch UI before we started on the iPhone. We spent a lot of time optimizing it to be as fast as possible - which is key for third party watch apps.

Always having your Grocery list in sorted order is the key to an efficient and effortless user experience on the watch. Because your list is in order, the item you just put in the cart that you’re looking to check off is visible immediately after raising your wrist without your needing to scroll to find it.

Raise your wrist, tap the item to check it off, look at the next item on the list, and lower your wrist. It’s a very quick interaction that makes shopping with the Apple Watch feel easy and efficient.


Adding Items

We also wanted adding items to your list to be as simple and fast as possible. The iPhone UI for adding items is optimized around speed and efficiency. The text field for adding an item and associated notes is always present at the bottom of the screen, within easy reach. Tapping the + button after entering an item keeps the keyboard up, ready to enter more items. And we built our own autocomplete system that populates from your personal history of purchased items, making repeat entries fast and easy.

You can also add items to the list on your Apple Watch, via dictation or scribble, or by picking a past item to add back to your list. We've all been in places where using our watch to do something is simpler than taking our phone out, and we wanted to make sure Grocery supported that use case.

But we didn't stop there. You can also add items to your Grocery list from the Mac, iPad, iCloud, and Siri! And even, via IFTTT, from Alexa. That's because Grocery is built on top of the iOS Reminders database, which supports shared lists on iCloud. When you start using Grocery, we prompt you to create a new list called "Grocery" (which you can change if you want to), that can be edited from any device with the Reminders app, or access to iCloud.com.

Support for Siri is something we've really grown attached to. Even the phrasing is simple with the default list name — "Add Eggs to my Grocery List", and items show up immediately after they're added. Voice assistants like Siri and Alexa work great in kitchen settings, and adding items to your shopping list that way is a great example of why.

And finally, because we're supporting iCloud Reminders lists, you can also share your list with a partner or roommate, and they can add items to your shared list from Grocery or from the Reminders app. You'll each see the items the other added in your list - but each person will still have a unique sorting order based on the order in which each person shops for items.


Conclusion

Grocery is launching today as a free app that includes Google app install ads, with an optional in-app purchase to remove ads and support future development of Grocery. We love using the app and are excited to introduce it. We hope you enjoy it!
 

Review: Nifty MiniDrive

IMG 9819

Having plenty of computer storage options available has always been important to me as an avid photographer and computer user. On the desktop thats easy to accomplish using both internal and external drives. But now that I've been using a laptop for work it's been harder to have more options for storage. External drives are a hassle, and additional internal drives are not an option on the next generation of Mac laptops.

I was really excited when I saw the Nifty MiniDrive on Kickstarter. The Nifty MiniDrive extends the onboard storage on a Mac laptop by utilizing the SD card slot to house a Micro SD card. This is a genius solution for elegantly adding a fair bit of flash storage to your laptop. I had always viewed the SD slot on laptops with skepticism because I use Compact Flash cards for my photography work. But this solution seemed like a great way to utilize that card slot while also giving me more options for storage.

The instructions for installing the drive on the Nifty website are very helpful. Installing the drive was straightforward. I did have to re-seat the Micro SD card once on my first installation to get it to seat correctly, but since there there's been no issues. The drive lines up very nicely on my laptop, as seen in the image above.

The Micro SD card I purchased for my MiniDrive is a Samsung 64GB drive. The other option I considered was a SanDisk 64GB drive. I typically use SanDisk drives for my photography work, but I decided to try out the Samsung because it was on sale and showed similar performance characteristics to the SanDisk. Straight read/write performance for the Samsung has been about what I would expect. Essentially it's similar to a USB 2.0 external drive for reads, and perhaps a bit slower for writes. Not all flash storage is created equal, and you're not going to set any speed records with SD cards like you might with USB 3.0 and Thunderbolt externals or newer SSD drives.


Screen Shot 2013 02 26 at 9 44 39 PM


The Nifty Team lists a few possible uses for the drive on their Kickstarter page. I decided to use my MiniDrive as a Time Machine backup for general documents, settings, and works in progress. The practical consideration behind this is that the largest currently available MicroSD card is 64GB - too small for backing up my entire startup drive. But the reality is that this is still large enough for what I need to back up. Source code is backed up by an SCM, and applications are easily replaceable. Photos I keep backed up using other methods, so any photos stored on my laptop are disposable.

After my initial tests, I set up the drive as my Time Machine backup volume. I configured Time Machine to exclude all of my apps, repositories, system data, caches, and any other large files that don't need to be backed up. That placed my total backup size in the 10-12GB range.

I use Time Machine as part of my Mac Pro's backup system too. I recently switched backup volumes on my Mac Pro and performed a 400GB initial backup of my startup drive. That backup took about 3 hours. I knew that an SD card is no where near as fast as an onboard SATA drive, but I was still expecting that the initial backup wouldn't take more than a few hours.

Screen Shot 2013 02 27 at 9 15 41 AM


In the end, the initial backup to the SD card took almost a full day to finish. I'm assuming that this is because of how many small files were included in the backup. The random small write speed of the SD card is not very fast compared to the large consecutive write speed that I was testing above. The screenshot of Activity Monitor above was while writing a single large file. Now, here's another screen shot while the backup was in progress. As you can see, the drive isn't maintaining a constant speed and so the backup ends up taking longer to finish.

Screen Shot 2013 02 26 at 9 46 56 PM

I finished the initial backup about two weeks ago, and I've been using the drive as my Time Machine volume ever since. The subsequent backups have finished much faster. I haven't noticed any performance issues while the backups are going on. Performance within the Time Machine is good as well with the MiniDrive. Scanning through file and folder versions for the past few weeks was fast and easy. I have not yet needed to recover a file from the ether of time yet, but backup isn't only about that. It's about the peace of mind you get by knowing that your data is safe. The Nifty MiniDrive gives me that, and in a stylish and elegant package to boot. In the end, that's what matters, and so I am very happy to have my Nifty MiniDrive.

Calendaring on Mac and iOS

I am a fairly heavy user of calendars. This goes back to college when I worked part time jobs while keeping a full class load. But now in the professional world it's more important than ever to manage my calendar so that I can maintain my commitments to the people I work with, as well as maintain a sane work/live balance at home. Here's how I've set up my tools to manage calendars.

Mutual Mobile uses all of the Google services like Gmail and Google Calendar. While I don't use Gmail or Google Calendar for my primary personal email or calendaring service, I've been very impressed with both. Google Calendar in particular is an excellent service. The service is based on the CalDAV standard which is very widely used and supported. Apple's own Calendar apps on both iOS and Mac support Google Calendar as a backend data source, but not without some problems. I spent some time this past weekend identifying these limitations and configuring my setup to work around them.

The first problem is that Apple seems really to want all of your Calendar data to live in iCloud. Normally this would be fine. When I migrated from MobileMe to iCloud I was pleased to find that all of my old events were still there. My iCloud account actually has events dating back to 2002, where I added an event to watch The Lord of the Rings: The Two Towers. But here's where things go wrong. If you leave your "Default Calendar" set to iCloud, and leave the "Automatically retrieve CalDAV invitations from Mail" setting on, then Calendar will create a new set of all your events on your default iCloud calendar, even though those event invitations were sent from Google! This got to be really frustrating when I realized I had about 2 years worth of duplicate calendar information. Useful tip: if you use Google for calendaring, either set that as your default calendar or just disable this setting in general.

Screen Shot 2013 01 01 at 3 03 06 PM

Another issue is how alerts work in iOS. Google does have a push notification service feature for Google Calendar, which works really well. But that service isn't without it's flaws either. By default it also sends you an email reminder for all events. That obviously gets extremely annoying, so I turned that feature off, but it will also give you a browser pop up alert 10 minutes before a meeting. Pop ups are even more annoying than emails but you can't disable that without disabling notifications altogether. Notifications are a problem solved pretty elegantly on iOS, and in OS X Mountain Lion, so I really just wanted to get that working without all the email/pop up cruft. Well it turns out that is possible, if you set the default alerts setting on Mac and iOS for event reminders. This setting is off by default, where Apple strangely elects to leave responsibility for alerts to Google, but you can turn it on for individual accounts. I set mine to 5 minutes on iOS and 10 minutes on Mac. A word of warning though, this event reminder is added to the calendar event the first time the event is synced to your Mac or iOS device. If you're enabling this for the first time, you should remove your Google calendars from your Mac or iOS device, enable the setting, and then re-add them to make sure you'll get all of your alerts when you expect them.

Screen Shot 2013 01 01 at 3 08 46 PM

The last major issue is probably the biggest problem though. Unlike on the Mac, the Calendar app on iOS will not automatically update itself. This is a huge problem for a number of reasons. For one thing, people will add or change events on your calendar all the time during the day. If your calendar isn't being updated, you'll miss them all or go to the wrong place at the wrong time. The other main problem is that if you have alerts set up as I describe above, then if your calendar isn't up to date you won't get any alerts! This is because all of those alerts are device notifications, not push notifications. The event has to be on the device so that the app knows to give you a notification prior to the event start time. With the proliferation of push Email you would think we would have push calendaring by now, but sadly that hasn't happened yet. In order to keep your calendar up to date you'll have to resort to fetch.

Since I have all my email set to either Push or Manual Fetch, I was in a bit of a pickle here. My personal Email is iCloud, which uses push. For work email I use the new Gmail app, which also uses push, so I leave the iOS account setting as manual fetch. But when you change the iOS configuration for your Gmail account, you only get one choice. I didn't feel like having all of my email being fetched every 30 minutes, so I added a new account. iOS gives you the option to also add a CalDAV account directly, so I disabled calendars on my Gmail account on iOS and added a new account just for my calendar. That enabled me to leave my email configured to manual fetch, and calendars to fetch automatically every 30 minutes.

Photo

I've tested the performance a bit by leaving my phone unpowered over night with the setting enabled. My phone seemed to lose between 2-3% power idling for 8 hours at night, and my iPad lost about 2%. When you combine that with the other notifications and stuff that my devices get overnight, that seems like an acceptable loss of power to have an up to date calendar.

I'm hoping that doing this bit of house cleaning will also enable me to try out other great calendar apps like Agenda and Fantastical, which I have tried but never really used because my calendar information on iOS was never as reliable as I wanted it to be. That forced me to always rely on Google Calendar on the web, or the Mac Calendar app, to do my calendaring. Now I should be much more free to do the bulk of my calendaring on iOS, which I think is the way things should be.