The two things I was most excited about while sitting in the audience for the WWDC 2019 keynote were the hotly anticipated encore for the Mac Pro tower computer, and the hotly debated introduction of the Catalyst framework for building Mac apps with UIKit. As a life long Mac user, and previous owner of earlier Mac towers, the introduction of the newest (and perhaps final) giant tower Mac was super exciting. But in some ways, the introduction of Catalyst was more meaningful to me personally as an engineer. Even though I've used a Mac for my entire life, and been programming since high school, I had never built an app for the Mac before.
So when I set out to build a version of my app Grocery for the Mac I knew from the beginning that I wanted it to be as Mac-like as possible. That meant menu bar menus full of keyboard actions, arrow key navigation for lists, right click context menus, expected features like open recent files, and adopting the Mac look and feel with translucent sidebars, a native Mac layout, and supporting system Dark mode and accent colors.

Honestly, getting Grocery to work the way I wanted it to with Catalyst was a lot easier than I thought it would be. Almost all of the work necessary was work I already had to do to build a great iPad app. Everything past that point, like supporting the menu bar, translucent sidebar, accent colors, dock actions, file open menus, etc. fell into place one piece at a time in a fairly orderly fashion.
But this isn't actually an article about Catalyst itself. Rather, this is an article about the final step in the process to Mac-ass the hell out of Grocery by publishing actions to the Mac services menu.
That step started when I re-read an excellent article by Steven Troughton-Smith called Beyond the Checkbox with Catalyst and AppKit. I had read the article over a year ago, and in hindsight it's incredible to me that Steven wrote this literally the first week that Catalyst was announced. Despite reading it a few days after he wrote it, I really needed to go through the process of getting my app ready for the Mac before I was able to really appreciate the additional power it contains. Here's what it let's you do.
What Steven describes in that article is how developers can create an AppKit plugin for their UIKit app running on the Mac. Normally, the UIKit part of a Catalyst app has no access to AppKit and thus can only interact with the parts of the Mac that Apple exposes through the Catalyst layer. But sitting behind all of that is AppKit itself, and the plugin system is the key to unlocking it.
The process of creating a plugin has a few hoops to jump through. The plugin is a bundle that is built and embedded in the target app at compile time. The bundle contains essentially whatever code you want it to. I called my bundle "Catalyst Bundle" and called its primary class "Catalyst App".
class CatalystApp : NSObject, CatalystDelegate {
    weak var callback : CatalystCallback?
}
The next step of the process is to actually load the bundle in your iOS app so that you can use it to talk to your plugin. Our bundle knows the name of its principal class, and also knows some information about its type (thanks to the Objective-C runtime). In my case, my principal class is a subclass of NSObject that conforms to an Objective-C protocol called "Catalyst Delegate". That way, I can create an instance of my principal class and cast it as a Catalyst Delegate. By storing a reference to that object in my app, I can treat it as a delegate to access functionality provided by the plugin.
class CatalystBridge {
    static func loadDelegate() -> CatalystDelegate? {
        #if targetEnvironment(macCatalyst)
        guard let url = Bundle.main.builtInPlugInsURL?.appendingPathComponent("Catalyst Bundle.bundle") else {
            return nil
        }
        guard let bundle = Bundle(path: url.path) else { return nil }
        guard bundle.load() else { return nil }
        guard let catalystBundle = bundle.principalClass as? NSObject.Type else { return nil }
        guard let delegate = catalystBundle.init() as? CatalystDelegate else { return nil }
        return delegate
        #else
        return nil
        #endif
    }
}
One other note about the bundle and protocol. I tried creating a Swift protocol of various forms (conforming to Class, NSObjectProtocol, etc.) but I was not able to get any of those protocols to work like this. Therefore, I resorted to declaring the protocol in Objective-C and including it in an Objective-C Bridging Header in both the plugin and my app target.
@protocol CatalystDelegate <NSObject>

- (void)setCallback:(nullable id<CatalystCallback>)callback;
- (void)setProxyIconFileURL:(nullable NSURL *)url;
- (void)setDockTileImageURL:(nullable NSURL *)url;

@end
Steven's article talks about all of the crazy things that an AppKit plugin like this lets you do. The first ones I tried involved overriding NSApplicationDelegate lifecycle methods. I wanted my app to quit after you closed the window: there's a delegate method for that. I experimented with changing the Dock tile, adding Dock menu actions, and adding a proxy icon in the title bar for the open Recipe file. I'm not shipping any of those changes yet because I didn't get everything to work the way I wanted to, but I am shipping the last thing that I tried which is publishing Services actions to the Services menu.
Services have been around on macOS X since the beginning, or close to it, but I only started using them personally fairly recently. Services are actions that operate on a type of content. The most common content types are text, images, files, and website URLs. I've created several services that operate on images and files as productivity tools. One of my favorites is a service to convert HEIC images into JPEGs (which should probably be built into the system at this point). I've got a few others for dealing with common types of files I use at work. When I saw Steven's mention of Services at the end of his article I knew I had to at least try it so I jumped in.
Trying to find documentation about how to define a Service action is virtually impossible. The most common search results all pertain to what we think of as "services" today, like iCloud or Apple Fitness+. The next most common search results are for user-facing ways to use Services, like Macworld and iMore articles for power users. The Apple tutorial for Services and this 2017 article by Kelvin Ng were the best documentation that I found but they still weren't enough to get everything working correctly for me. I'll try and fill in some of the missing pieces below.
A service definition starts with an entry in the Plist file. This is certainly where the bulk of Apple's documentation focuses, and most of it is pretty helpful. Under the NSServices key there's an array of service dictionaries. The most important keys in each service are the NSMenuItem, which defines the title of the service, the NSMessage, which defines signature of the method that will be called to activate the service, and the NSPortName, which is just the name of the app.
The other 3 keys that I made use of are the NSRequiredContext, NSSendTypes, and NSReturnTypes. The first lesson I learned is that NSRequiredContext needs to be defined with an empty dictionary before the service will appear at all - so that's step one. NSReturnTypes is only required if you plan on building a service that modifies data and sends it back, so if your service is only used for sending data from another app into yours then you can ignore that one.
<dict>
    <key>NSMenuItem</key>
    <dict>
        <key>default</key>
        <string>Add Items to Grocery List</string>
    </dict>
    <key>NSMessage</key>
    <string>addToList</string>
    <key>NSPortName</key>
    <string>Grocery</string>
    <key>NSRequiredContext</key>
    <dict/>
    <key>NSSendTypes</key>
    <array>
        <string>NSStringPboardType</string>
    </array>
</dict>
NSSendTypes was the trickiest for me to figure out. For text based services you only need to put NSStringPboardType in here. But I had trouble finding the right send types for a service I wanted to make that operated on files. I tried a few things that didn't work, but in the end I ended up checking the Info.plist file for BBEdit to see how they defined their "Open File in BBEdit" Service. They provide both the public.file-url and public.utf8-plain-text send types, which is what I ended up using for my Service (and so far is working great).
<dict>
    <key>NSMenuItem</key>
    <dict>
        <key>default</key>
        <string>Send Recipe to Grocery</string>
    </dict>
    <key>NSMessage</key>
    <string>importRecipe</string>
    <key>NSPortName</key>
    <string>Grocery</string>
    <key>NSSendTypes</key>
    <array>
        <string>public.utf8-plain-text</string>
        <string>public.file-url</string>
    </array>
    <key>NSRequiredContext</key>
    <dict>
        <key>NSTextContent</key>
        <array>
            <string>FilePath</string>
        </array>
    </dict>
</dict>
Back in my Catalyst App plugin class, I have a function that gets called after the app starts up that registers itself as the NSApplication's servicesProvider. By registering as the services provider I'm telling the system what class to send messages to when a service is activated.
extension CatalystApp {
    func setCallback(_ callback: CatalystCallback?) {
        self.callback = callback

        NSApplication.shared.servicesProvider = callback == nil ? nil : self

        NSUpdateDynamicServices()
    }
}
That also means that I need to implement methods on my Catalyst App class for each of the services that I defined in my Info.plist file. The method is named with the value I provided in the NSMessage key of my Info.plist file, and is passed 3 parameters: an NSPasteboard, a userData string, and a pointer to an error that can be displayed in the console if something goes wrong.
Since these have to be Objective-C compatible methods for the services system to send messages to them, I had a few hoops to jump through to implement them in Swift. Here's an example of what one of them looks like for the "addToList" Service that adds the selected text content to the grocery list.
@objc func addToList(_ pboard: NSPasteboard, userData: String, error: NSErrorPointer) {
        if let string = pboard.string(forType: .string) {
            callback?.didReceiveAddItems(toList: string)
        }
    }
Getting data out of the pasteboard and putting it back into the pasteboard is pretty much the same as it is in UIKit. The only two issues I ran into here were that the string representation of a fileURL needs to actually be converted into a real URL using the URL(string:) initializer before you can read it. Otherwise it's not useful.
@objc func importRecipe(_ pboard: NSPasteboard, userData: String, error: NSErrorPointer) {
        if let path = pboard.string(forType: .fileURL) {
            callback?.didReceiveAddRecipe(toGrocery: path)
        }
    }
The other issue was that adding items to the clipboard using setString: didn't actually do anything. I had to call clearContents() on the pasteboard first and then use the writeObjects method to add content back before it would actually replace my selected text in another app.
@objc func cleanUp(_ pboard: NSPasteboard, userData: String, error: NSErrorPointer) {
        if let string = pboard.string(forType: .string) {
            let returnText = callback?.didReceiveCleanUpRequest(with: string) ?? string

            pboard.clearContents()
            pboard.writeObjects([returnText as NSString])
        }
    }
The final piece of the puzzle for me was creating another delegate protocol for my plugin to communicate back to my iOS app to tell it when the Service received a new request. I created this as another simple Objective-C protocol to share with the same header file that I used earlier, and made my iOS app's app delegate conform to it. Now my plugin can send action requests and lifecycle events back up to my iOS app that it can pass through the appropriate methods that it already has access to. That works out nicely because all of the Services I created already map closely to NSUserActivity-based Shortcuts that my app supports, so the necessary code to handle them already exists.
@protocol CatalystCallback <NSObject>

- (void)didReceiveAddItemsToList:(nonnull NSString *)text;
- (void)didReceiveAddRecipeToGrocery:(nonnull NSString *)path;
- (void)didReceiveCreateRecipeWith:(nonnull NSString *)text;
- (nonnull NSString *)didReceiveCleanUpRequestWith:(nonnull NSString *)text;

@end
The end result for Grocery is 4 different Services that provide access to some of the most important features of the app:
- Add Items to Grocery List - add selected text separated by newlines to the current grocery list
- Clean Up Items using Grocery - modify the selected text using Grocery's CleanUp feature to prettify text
- New Recipe with Selection - start a new recipe with the selected text
- Send Recipe to Grocery - import a plain text file containing a Recipe into Grocery

Unmodified Text

Selected Service
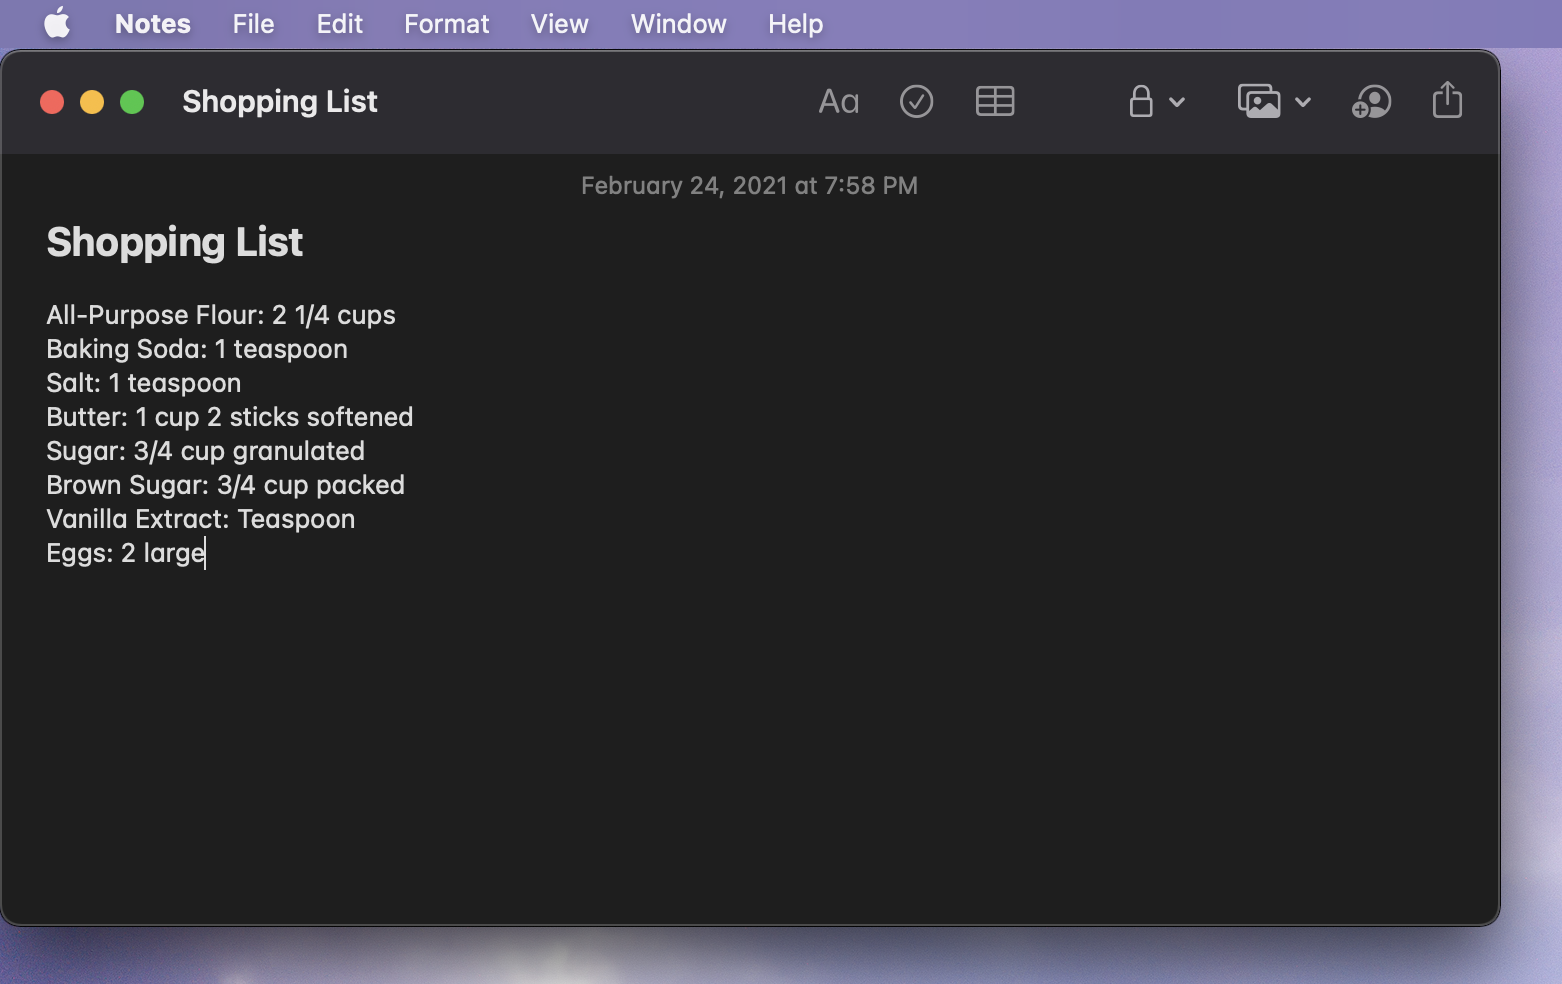
Cleaned Up Text
I'm really happy with how these Services turned out. I doubt this is a feature that many users would have asked for, but for me that wasn't the point of trying to build it. I just wanted to prove to myself that it was possible to build something supremely Mac-like in my Catalyst-based app, and I'm very happy to report that it is. And even more importantly to me, this brief little forray into AppKit has me even more excited about continuing to add more Mac-ness to Grocery in the future so that it will continue to be as Mac-assed as it possibly can be.